Prepare hosts
DNS Setup
root@master-node:~# cat /etc/hosts
127.0.0.1 localhost
192.168.2.201 master-node
192.168.2.202 slave-node1
192.168.2.203 slave-node2
192.168.2.204 slave-node3

# The following lines are desirable for IPv6 capable hosts
::1 localhost ip6-localhost ip6-loopback
ff02::1 ip6-allnodes
ff02::2 ip6-allrouters
Add kernel modules
root@master-node:~# cat /etc/modules
# /etc/modules: kernel modules to load at boot time.
#
overlay
br_netfilter
nf_conntrack
Install packages for VirtualBox additions
apt-get install linux-headers-$(uname -r)
apt-get install build-essential
Install VirtualBox additions after that.
Install NFS packages
Server (master-node)
apt install nfs-kernel-server
Worker nodes
apt install nfs-common
Configure NFS shares
Create volumes/directories to be shared
root@master-node:~# mkdir -p /var/nfs/vol
root@master-node:~# mkdir -p /var/nfs/vol1
root@master-node:~# mkdir -p /var/nfs/vol2
root@master-node:~# mkdir -p /var/nfs/vol3
Configure shares
root@master-node:~# cat /etc/exports
/var/nfs/vol    192.168.2.0/24(rw,sync,no_root_squash,no_subtree_check)
/var/nfs/vol1   192.168.2.0/24(rw,sync,no_root_squash,no_subtree_check)
/var/nfs/vol2   192.168.2.0/24(rw,sync,no_root_squash,no_subtree_check)
/var/nfs/vol3   192.168.2.0/24(rw,sync,no_root_squash,no_subtree_check)
Configure service
root@master-node:~# systemctl is-enabled nfs-server
enabled
root@master-node:~# systemctl restart nfs-server
Verify access from the server and from the worker nodes
root@master-node:~# showmount --exports 192.168.2.201
Export list for 192.168.2.201:
/var/nfs/vol3 192.168.2.0/24
/var/nfs/vol2 192.168.2.0/24
/var/nfs/vol1 192.168.2.0/24
/var/nfs/vol  192.168.2.0/24
root@slave-node1:~# showmount --exports 192.168.2.201
Export list for 192.168.2.201:
/var/nfs/vol3 192.168.2.0/24
/var/nfs/vol2 192.168.2.0/24
/var/nfs/vol1 192.168.2.0/24
/var/nfs/vol 192.168.2.0/24Disable IPv6
vi /etc/sysctl.conf
…
net.ipv6.conf.all.disable_ipv6=1
net.ipv6.conf.default.disable_ipv6=1
net.ipv6.conf.lo.disable_ipv6=1
Start installing Kubernetes cluster
k0s
https://techviewleo.com/how-to-backup-and-restore-k0s-kubernetes-cluster/
https://docs.k0sproject.io/v1.23.6+k0s.1/k0sctl-install/
https://techviewleo.com/deploy-kubernetes-cluster-on-debian-using-k0s/
MetalLB (Updated)
Follow the instruction here: https://computingforgeeks.com/deploy-metallb-load-balancer-on-kubernetes/
To install MetalLB, apply the manifest:
kubectl apply -f https://raw.githubusercontent.com/metallb/metallb/v0.13.9/config/manifests/metallb-native.yaml
Instead of adding a configmap, we now add a resource definition for IP address pool:
apiVersion: metallb.io/v1beta1
kind: L2Advertisement
metadata:
  name: l2-ip
  namespace: metallb-system
spec:
  ipAddressPools:
  - default-pool
---
apiVersion: metallb.io/v1beta1
kind: IPAddressPool
metadata:
  name: default-pool
  namespace: metallb-system
spec:
  addresses:
  - 192.168.2.240/28
Install Helm
https://helm.sh/docs/intro/install/#from-apt-debianubuntu
Kubernetes NFS Subdir External Provisioner
https://github.com/kubernetes-sigs/nfs-subdir-external-provisioner
root@master-node:~# helm repo add nfs-subdir-external-provisioner https://kubernetes-sigs.github.io/nfs-subdir-external-provisioner/
"nfs-subdir-external-provisioner" has been added to your repositories

root@master-node:~# helm install nfs-subdir-external-provisioner nfs-subdir-external-provisioner/nfs-subdir-external-provisioner --set nfs.server=192.168.2.201 --set nfs.path=/var/nfs/vol1
NAME: nfs-subdir-external-provisioner
LAST DEPLOYED: Thu Apr 28 16:17:19 2022
NAMESPACE: default
STATUS: deployed
REVISION: 1
TEST SUITE: None
Make NFS storage class default
kubectl patch storageclass nfs-client -p ‘{“metadata”: {“annotations”:{“storageclass.kubernetes.io/is-default-class”:”true”}}}’


olegme@master-node:~/k0suser@computer$ kubectl get storageclass
NAME PROVISIONER RECLAIMPOLICY VOLUMEBINDINGMODE ALLOWVOLUMEEXPANSION AGE
nfs-client (default) cluster.local/nfs-release-nfs-subdir-external-provisioner Delete Immediate true 8m12s
Configure example POD to use the external NFS Provisioner
Vagualy based on https://kubernetes.io/docs/tasks/configure-pod-container/configure-persistent-volume-storage/
Crucial element is in the PV Claim definition:
root@master-node:~/k0s/manifests# cat pv-claim.yaml
apiVersion: v1
kind: PersistentVolumeClaim
metadata:
  name: task-pv-claim
spec:
  storageClassName: nfs-client
  accessModes:
    - ReadWriteOnce
  resources:
    requests:
      storage: 1Gi
Note storageClassName attribute nfs-client, it is the same as the storageClass definition we created in the previous step.
Alternative to NFS Provisioner – Local Path Provisioner
To be found here – https://github.com/rancher/local-path-provisioner
Lately, I experienced some strange issues with PostgreSQL installation using NFS provisioner and couldn’t really find the root cause. So I decided to move over to this simplest one. Don’t forget to change the default storage class!
Install PostgreSQL cluster
PostgreSQL Operator
Start with the instruction from https://github.com/zalando/postgres-operator up to the point where you are ready to deploy the first PostgreSQL cluster via the GUI. Then use GUI to create a skeleton of the deployment YAML.
Create cluster
Start with the GUI:
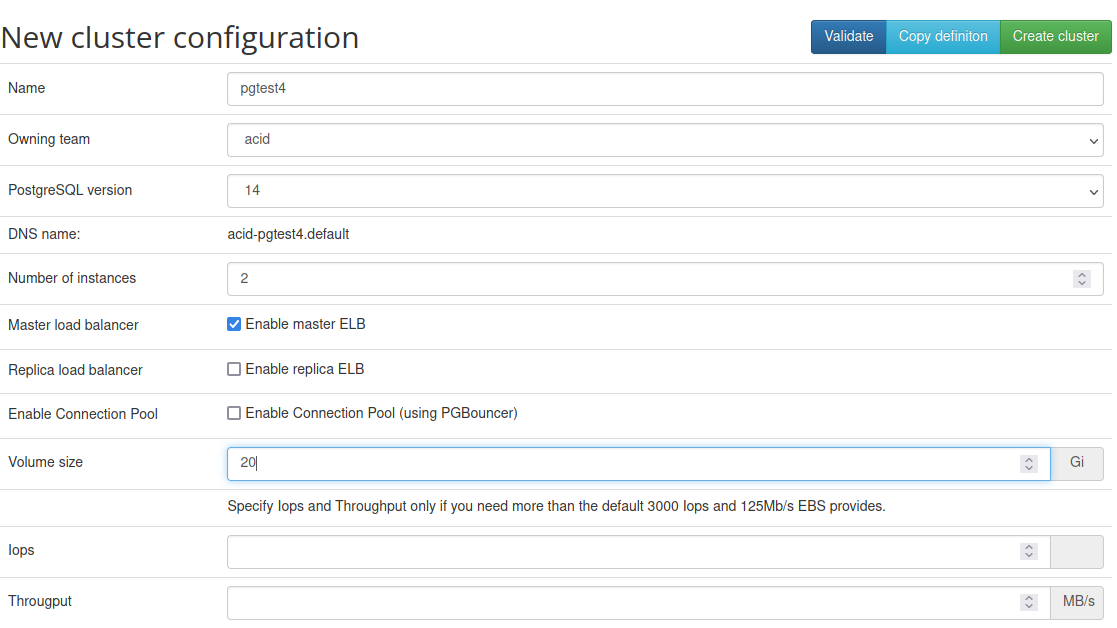
But don’t hit Create Cluster button, use Copy instead and put it into a YAML file:
root@master-node:~/k0s/manifests# vi pgtest4.yaml
kind: "postgresql"
apiVersion: "acid.zalan.do/v1"
metadata:
name: "acid-pgtest4"
namespace: "default"
labels:
team: acid
spec:
teamId: "acid"
postgresql:
version: "14"
numberOfInstances: 2
enableMasterLoadBalancer: true
enableConnectionPooler: false
volume:
size: "20Gi"
storageClass: nfs-client
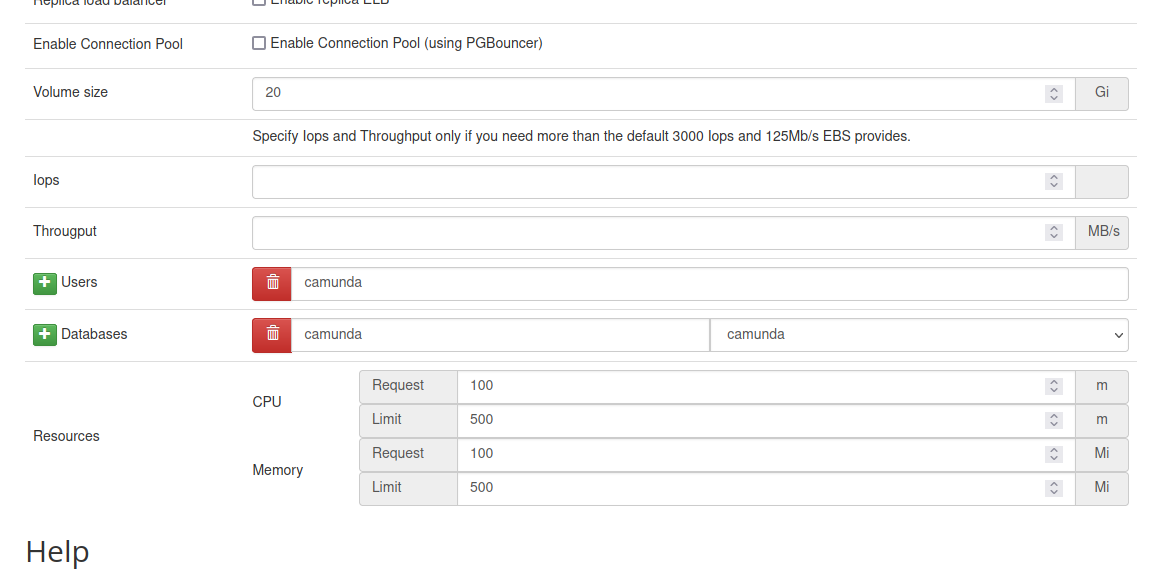
users:
camunda: []
databases:
camunda: camunda
allowedSourceRanges:
# IP ranges to access your cluster go here
- 0.0.0.0/0
resources:
requests:
cpu: 100m
memory: 100Mi
limits:
cpu: 500m
memory: 500Mi
Two critical attributes cannot be added via GUI. storageClass: nfs-clinet will make sure that the PV Claims created request volumes from the NFS Provisioner and allowedSourceRanges: 0.0.0.0/0 will allow connection to the database cluster from any IP. If not specified, it will allow connections only from the localhost. This can be refined later.
Apply the created YAML file:
root@master-node:~/k0s/manifests# kubectl apply -f pgtest4.yaml
postgresql.acid.zalan.do/acid-pgtest4 created
And after a while observe your new PostgreSQL cluster be created:
root@master-node:~/k0s/manifests# kubectl get svc -w
NAME                   TYPE           CLUSTER-IP       EXTERNAL-IP     PORT(S)          AGE
acid-pgtest2           LoadBalancer   10.99.248.241    192.168.2.241   5432:32015/TCP   16h
acid-pgtest2-config    ClusterIP      None             <none>          <none>           16h
acid-pgtest2-pooler    ClusterIP      10.97.131.198    <none>          5432/TCP         16h
acid-pgtest2-repl      ClusterIP      10.96.181.13     <none>          5432/TCP         16h
acid-pgtest3           LoadBalancer   10.103.54.35     192.168.2.242   5432:32518/TCP   13h
acid-pgtest3-config    ClusterIP      None             <none>          <none>           13h
acid-pgtest3-repl      ClusterIP      10.105.80.150    <none>          5432/TCP         13h
acid-pgtest4           LoadBalancer   10.102.124.164   192.168.2.243   5432:32511/TCP   2m6s
acid-pgtest4-config    ClusterIP      None             <none>          <none>           2m
acid-pgtest4-repl      ClusterIP      10.99.60.140     <none>          5432/TCP         2m6s
kubernetes             ClusterIP      10.96.0.1        <none>          443/TCP          2d17h
my-nginx               LoadBalancer   10.111.11.252    192.168.2.240   80:31001/TCP     25h
nginx-deployment       NodePort       10.104.72.240    <none>          80:30598/TCP     2d
postgres-operator      ClusterIP      10.101.22.126    <none>          8080/TCP         17h
postgres-operator-ui   ClusterIP      10.107.252.167   <none>          80/TCP           17h
Our new Service is now up and available on the IP 192.168.2.243. Let’s check it.
We will need a password for our user camunda. We can do the following:
root@master-node:~/k0s/manifests# export PGPASSWORD=$(kubectl get secret camunda.acid-pgtest4.credentials.postgresql.acid.zalan.do -o 'jsonpath={.data.password}' | base64 -d)
root@master-node:~/k0s/manifests# echo $PGPASSWORD
ue2qB7ZQaykqAORAhpEvkps4GuvTrOYBzdnvf7XPirCyFtZVWWozJr6P5ggVjnW3
root@master-node:~/k0s/manifests#
In the first line above camunda is the user name and acid-pgtest4 is the name of the service. With the above we set an environment variable, which will be used in psql command:
root@master-node:~/k0s/manifests# psql -U camunda -h 192.168.2.243
psql (13.5 (Debian 13.5-0+deb11u1), server 14.2 (Ubuntu 14.2-1.pgdg18.04+1))
WARNING: psql major version 13, server major version 14.
Some psql features might not work.
SSL connection (protocol: TLSv1.3, cipher: TLS_AES_256_GCM_SHA384, bits: 256, compression: off)
Type "help" for help.
camunda=> \l
List of databases
Name | Owner | Encoding | Collate | Ctype | Access privileges
-----------+----------+----------+-------------+-------------+-----------------------
camunda | camunda | UTF8 | en_US.utf-8 | en_US.utf-8 |
postgres | postgres | UTF8 | en_US.utf-8 | en_US.utf-8 |
template0 | postgres | UTF8 | en_US.utf-8 | en_US.utf-8 | =c/postgres +
| | | | | postgres=CTc/postgres
template1 | postgres | UTF8 | en_US.utf-8 | en_US.utf-8 | =c/postgres +
| | | | | postgres=CTc/postgres
(4 rows)
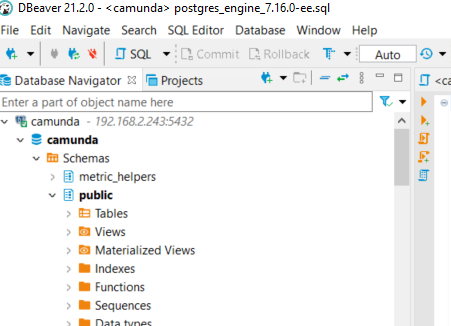
camunda=>The database can be now accessed from the host machine as well:
Camunda Engine
Install via Helm chart
Starting point: https://camunda.com/blog/2021/08/releasing-camunda-platform-community-helm-chart/
Secrete creation differs a bit, different user and also the password, which we already setup for PostgreSQL access in the previous part.
root@master-node:~# kubectl create secret generic                   \
    camunda-bpm-platform-db-credentials             \
    --from-literal=DB_USERNAME=camunda \
    --from-literal=DB_PASSWORD=ue2qB7ZQaykqAORAhpEvkps4GuvTrOYBzdnvf7XPirCyFtZVWWozJr6P5ggVjnW3
secret/camunda-bpm-platform-db-credentials created
Number of instances can be adjusted in the values.yaml. The file will look like this:
root@master-node:~# cat k0s/manifests/values.yaml
# Default values for camunda-bpm-platform.
# This is a YAML-formatted file.
# Declare variables to be passed into your templates.

general:
  debug: false
  replicaCount: 3
  nameOverride: ""
  fullnameOverride: "camunda-bpm-platform"

image:
  repository: camunda/camunda-bpm-platform
  tag: latest
  pullPolicy: IfNotPresent
  pullSecrets: []
  command: []
  args: []

# By default H2 database is used, which is handy for demos and tests,
# however, H2 is not supported in a clustered scenario.
# So for real-world workloads, an external database like PostgreSQL should be used.
database:
  driver: org.postgresql.Driver
  url: jdbc:postgresql://acid-pgtest4:5432/camunda
  credentialsSecretName: camunda-bpm-platform-db-credentials

service:
  type: LoadBalancer
  port: 8080
  portName: http

metrics:
  enabled: false
  service:
    type: ClusterIP
    port: 9404
    portName: metrics
    annotations:
      prometheus.io/scrape: "true"
      prometheus.io/path: "/"
      prometheus.io/port: "9404"

...
Note that the service type has to be set to LoadBalancer if we deploy more than one instance. This has one caveat, though. With the current Helm chart, it is impossible to specify the sessionAffinity attribute. The web interface will behave somewhat weirdly if we don’t do that. For example, you won’t be able to disable the Telemetry consent pop-up or won’t be able to log in at all. Obviously, the Helm chart has to be adjusted, but the short-term solution would be to patch the service configuration post-install. In my case, I was able to accomplish this directly from Lens.
Here is an excerpt from its manifest after the patching:
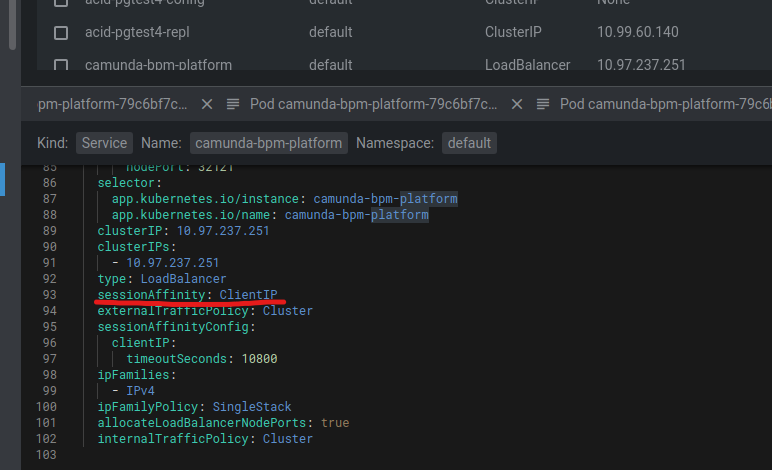
Update. Here is also a command line version of the patching process:
kubectl patch svc camunda-bpm-platform -p '{"spec": {"sessionAffinity": "ClientIP"}}'Confirm we can access the engine
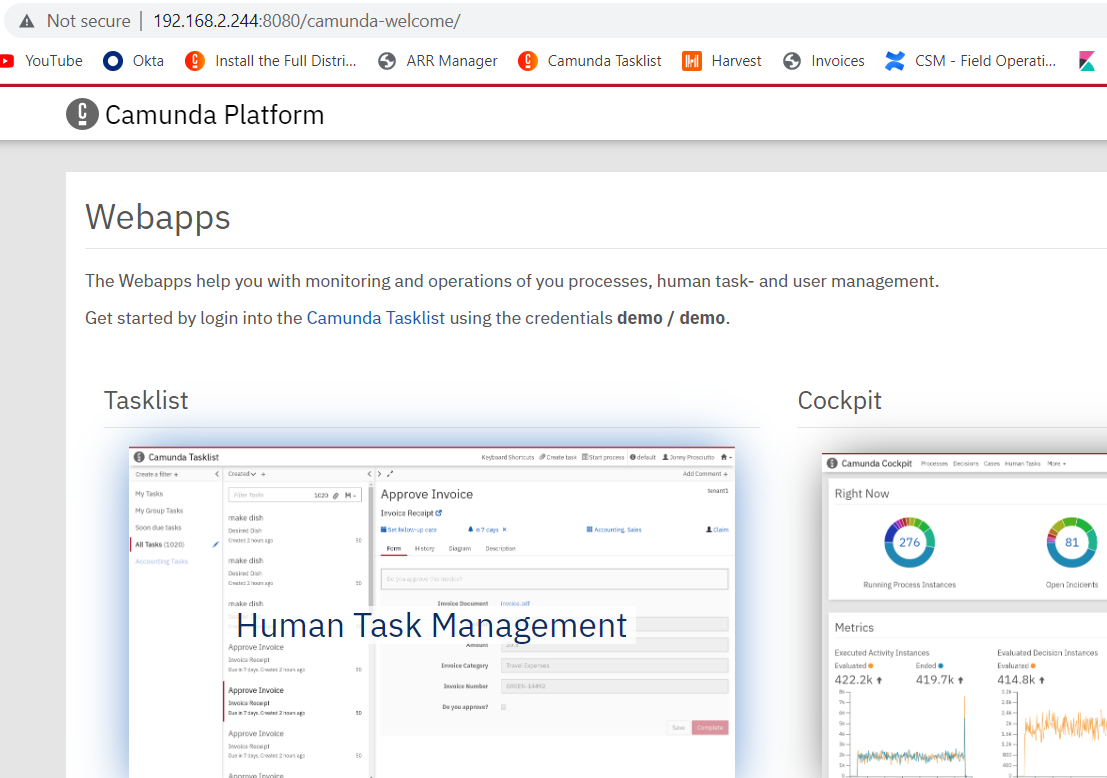
To be continued…
What we have achieved so far. We have installed a bare metal Kubernetes cluster with k0s, we have a working PostgreSQL cluster and a working Camunda 7.17 installation.
Let’s fill it with life and continue to the next article Docker, Kubernetes, and Co. – part II
You may also want to take a look at one of the previously published articles as we will be doing something similar: Camunda on Oracle Cloud – will it work?