
Subject
In this article, I describe how to install and run Camunda BPM engine on Oracle Cloud. I created this post as I had some spare hours between two jobs in winter 2020, then sort of forgot about it and publish it now with a delay of a few months.
The goal was just to see if this works and not intended to be used for any Production use. And the answer is – yes, it works!
Background
Oracle started to offer their Oracle Cloud free Tier in Autumn 2019 and I decided to try it out. I configured two Compute instances, Autonomous Transaction Processing (ATP) database, but then I didn’t know what to do next. So, it was just sitting there and doing nothing.
Then one happy day I learned about Camunda BPM engine. It can be used as an Open Source product and thus free as well. All in all, a good opportunity to use one’s spare time.
The easiest way to get started with Camunda BPM is to use the Spring-Boot package, which can be run just on a laptop. But I’m not looking for easy ways and so I decided to deploy it on a Tomcat application server using Oracle ATP database as it’s backend.
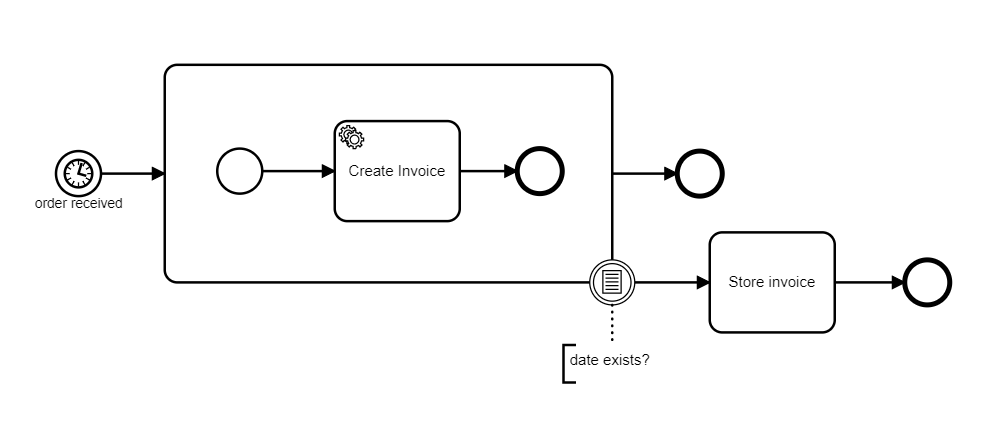
Process Model
I took the simplest model from the Camunda Quick Start application. Here is the diagram:
Plattform/Tools
- Oracle Cloud free Tier provisioned in September 2019
- Oracle Autonomous Transaction Processing database included in Oracle Free Tier, version 18c
- Camunda BPM v 7.12
- node.js v10.19.0 on Oracle Linux
- Perl v5.30.1 (strawberry) on Windows 10
Solution
Big picture
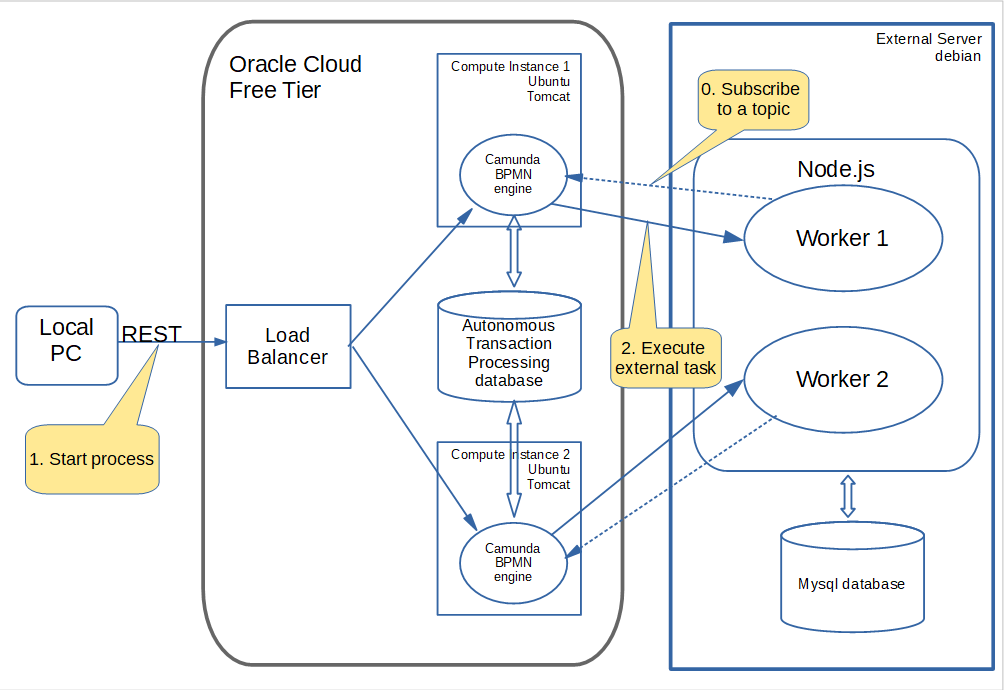
Here is a short description of what we are doing.
First of all, an external Task executor has to be started. It will register with the Camunda BPM engine for a particular topic. This is step 0 in the above diagram.
We start the process with an application, running on a local PC. This is step 1. This application starts the process via REST API exposed by Camunda engine. The engine starts a process instance, which in turn executes Create Invoice task and an external service starts execution, this happens in step 2.
This external service stores new invoice information in its own mysql database. Then the Store invoice task does effectively nothing and the process ends.
In the following paragraphs, individual building blocks are described in more detail.
Oracle Cloud and the components we need
The setup of basic components on Oracle Public Cloud is very straightforward and Oracle provides good documentation, which will walk you through the setup. So I’ll describe only the things, that took me more than a minute to figure out.
Compute Instances
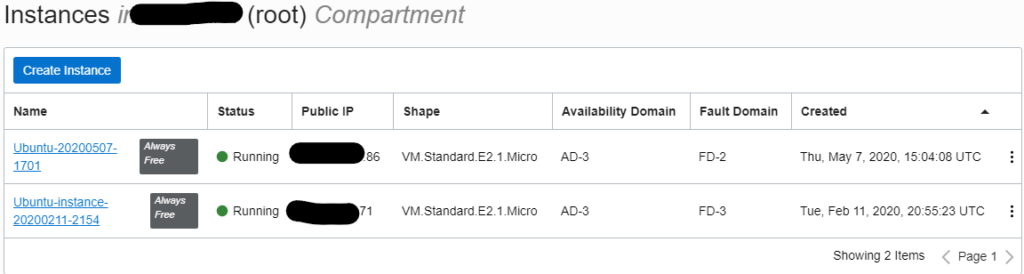
I decided to set up a cluster and ended up with two ubuntu 18.04 instances. I also configure access via SSH using public IPs. Although it was possible to use only private IPs, having public ones make things easier to understand and debug.
Still there are few things to be aware of.
Console user on ubuntu hosts in Oracle Public Cloud is “ubuntu”. Password is not needed, private/public key authentication is used.
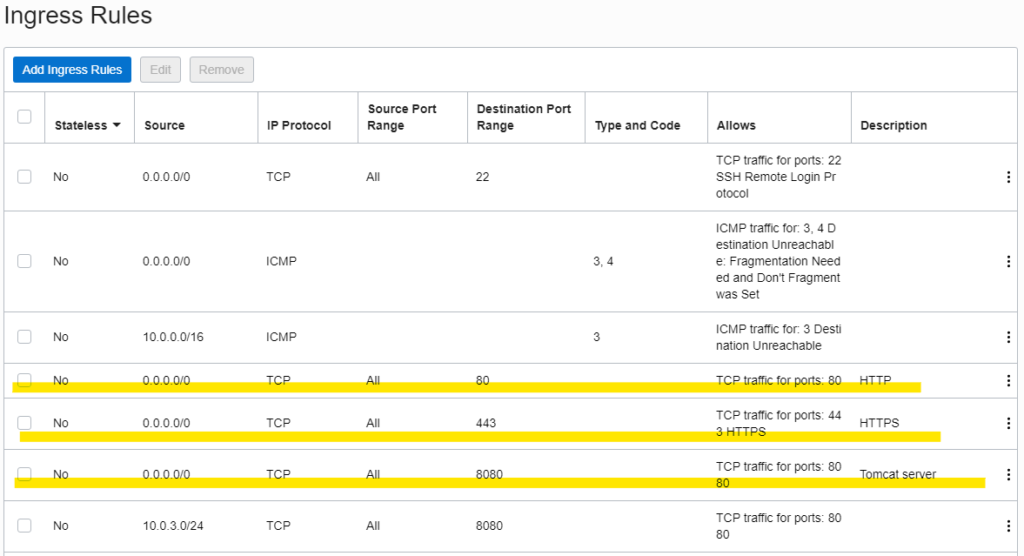
Access to ssh, http and https ports have to be enabled on both hosts via iptables as well as in the Default Security list for the respective VCN (Virtual Cloud Network).
Tomcat
Nothing special here, just tomcat 9.0 installation on both hosts. Just don’t forget to open port 8080 in the Default Security list and in both host’s iptables.
Load balancer
This is the least obvious part of the setup. There are two parts to it, Backend Set, which specifies the back-end servers. And the Listener, which specifies what happens at the front-end.
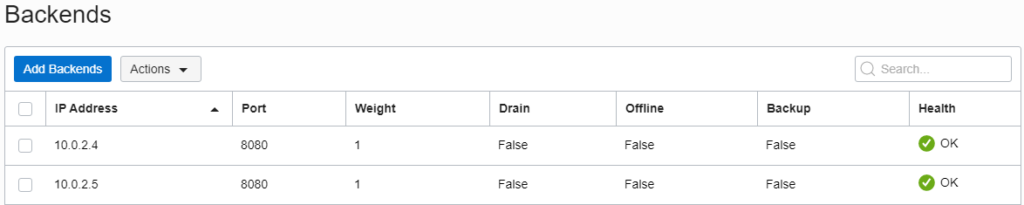
My two tomcat servers are configured in the Backend Set like this:
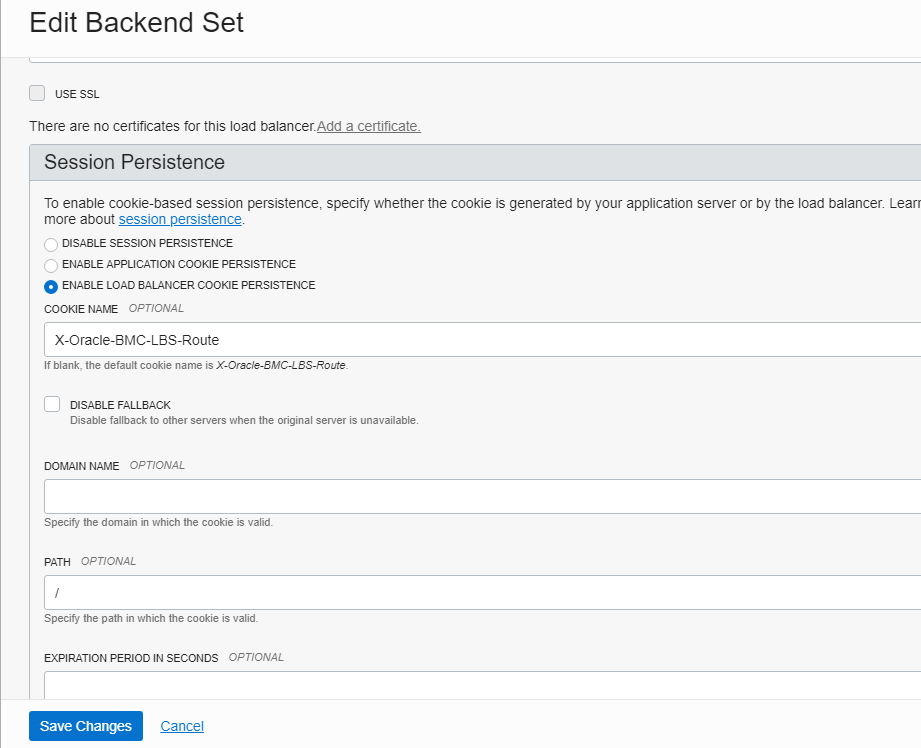
Port number and IP Address actually tell how load balancer will check if the backend servers are alive. Another part of it is Session Persistance configuration. Below is the picture. I believe this is only important if I connect via browser to the Cockpit application, my REST client and worker applications will disregard session persistence cookies anyway.
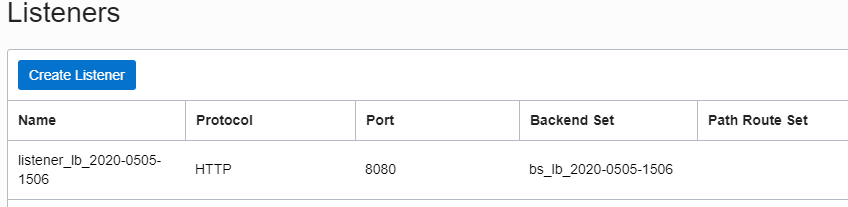
Another piece is the Listener. It will listen to the external connections on port 8080. Note that it has its own public IP address. Here is the picture:
ATP database and jdbc
This is real fun. Oracle ATP (Autonomous Transaction Processing) database is the most special part of this whole setup. There are examples and also some documentation as to how to configure Camunda BPM with Oracle database, still, these examples use Oracle database on-premise. Also, the configuration steps so far are not much different from the same on any other tomcat server(s).
The culprit is that to connect to Oracle ATP one has to use a so-called Wallet. It can be downloaded from the ATP configuration page and is in fact a zip file, which contains some artifacts needed to establish a connection and to authenticate. This file can also be used to connect to Oracle ATP with sqldeveloper. This file has to be then uploaded to both Compute instances and extracted to some directory. I put it under /home/ubuntu
root@instance-20200211-2154:/# ls -al /home/ubuntu/Wallet_DB202004201344
total 48
drwxr-xr-x 2 root   root   4096 Apr 23 12:16 .
drwxr-xr-x 7 ubuntu ubuntu 4096 May 29 20:37 ..
-rw-r--r-- 1 root   root    319 Apr 20 11:53 README
-rw-r--r-- 1 root   root   6725 Apr 20 11:53 cwallet.sso
-rw-r--r-- 1 root   root   6680 Apr 20 11:53 ewallet.p12
-rw-r--r-- 1 root   root   3274 Apr 20 11:53 keystore.jks
-rw-r--r-- 1 root   root    691 Apr 20 11:53 ojdbc.properties
-rw-r--r-- 1 root   root    114 Apr 20 11:53 sqlnet.ora
-rw-r--r-- 1 root   root   1941 Apr 20 11:53 tnsnames.ora
-rw-r--r-- 1 root   root   3335 Apr 20 11:53 truststore.jks
Next important step is to download Oracle 19.3 JDBC driver and put the below files into tomcat lib directory, like this:
root@ubuntu-20200507-1701:/home/ubuntu# ls -alt /usr/share/tomcat9/lib
total 34568
drwxr-xr-x 2 root   root      4096 May  7 16:33 .
-rw-r--r-- 1 ubuntu ubuntu 1398331 May  7 16:27 ucp.jar
-rw-rw-r-- 1 ubuntu ubuntu    8476 May  7 16:27 slf4j-jdk14-1.7.26.jar
-rw-rw-r-- 1 ubuntu ubuntu   41139 May  7 16:27 slf4j-api-1.7.26.jar
-rw-r--r-- 1 ubuntu ubuntu  306854 May  7 16:27 osdt_core.jar
-rw-r--r-- 1 ubuntu ubuntu  205152 May  7 16:27 osdt_cert.jar
-rw-r--r-- 1 ubuntu ubuntu  307817 May  7 16:27 oraclepki.jar
-rw-r--r-- 1 ubuntu ubuntu  144428 May  7 16:27 ons.jar
-rw-r--r-- 1 ubuntu ubuntu 4161744 May  7 16:27 ojdbc8.jar
...
The last step is to configure JNDI resource reference in the tomcat server.xml file:
...
  <GlobalNamingResources>
    <!-- Editable user database that can also be used by
         UserDatabaseRealm to authenticate users
    -->
    <Resource name="UserDatabase" auth="Container"
              type="org.apache.catalina.UserDatabase"
              description="User database that can be updated and saved"
              factory="org.apache.catalina.users.MemoryUserDatabaseFactory"
              pathname="conf/tomcat-users.xml" />
        <Resource name="jdbc/ProcessEngine" auth="Container"
           factory="oracle.ucp.jdbc.PoolDataSourceImpl"
           type="oracle.ucp.jdbc.PoolDataSource"
           description="UCP Pool in Tomcat for Camunda"
           connectionFactoryClassName="oracle.jdbc.pool.OracleDataSource"
           minPoolSize="5"
           maxPoolSize="50"
           initialPoolSize="15"
           user="camunda"
           password="G%j0pDpN4oE5"
           url="jdbc:oracle:thin:@db202004201344_medium?TNS_ADMIN=/home/ubuntu/Wallet_DB202004201344"
         />
...
The trieckest part is of course in the line #21. It points to the Wallet files location. It’s imprtant to make sure that this location is accessible to the tomcat/java process.
Obviously tomcat has to be restarted after making the changes. Note though, that further changes will be needed in server.xml for Camunda, they will be discussed later.
This is a good resource to read more: https://www.oracle.com/database/technologies/java-connectivity-to-atp.html
Camunda BPM
There is nothing special about this, Camunda BPM will be installed on to both tomcat servers running on our two compute instances. I followed this documentation: https://docs.camunda.org/manual/7.12/installation/full/tomcat/manual/. This link points to the Release 7.12 documentation, this was the latest release available at the time of writing. And I used the Community Edition of Camunda BPM.
The database creation script is delivered as a part of the distribution, to apply it to the Oracle ATP database I used Oracle sqldeveloper-19.2.1.247.2212. Database Wallet zip file has to be downloaded to the local PC, where sqldeveloper is installed. “Cloud Wallet” has to be selected as a connection type when connecting to the ATP database.
Following the documentation, some jar file coming with the Camunda distribution have to be added to the tomcat lib directory and changes made in the server.xml file to configure necessary listeners. And of course, the data source, as described in the previous section.
In fact, Camunda BPM installation on Oracle Public Cloud differs from any other environment only with data source configuration to connect to the ATP database.
Two more applications have to be installed, Cockpit, Tasklist and Admin as one and REST-API as another one. I missed this in the beginning and it took me some time additional time to make things work.
Finally we will have two Camunda BPM instances on tomcat cluster with two nodes, using a shared ATP database.
External Task service
Back to the process diagram, our “Create Invoice” tasks is an External Task. It needs an external service, which does the actual job. I implemented this as an external node.js worker, running on a separate ubuntu host. I used the example in Camunda Quick Start documentation: https://docs.camunda.org/get-started/quick-start/service-task/#b-using-javascript-nodejs.
Camunda provides an external task client implementation as a library, available via npm:
...
npm install camunda-external-task-client-js
npm install -D open
...
My implementation is in a single JS file and it does the following. It creates two workers, each of them connected to the respective Camunda BPM instance in our tomcat cluster on Oracle Public Cloud. Note different IP addresses and also different workerId‘s:
...
const config = {
  baseUrl: "http://xxx.xxx.xxx.71:8080/engine-rest",
  use: logger,
  asyncResponseTimeout: 10000,
  workerId: 'Client_1'
};
// create a Client instance with custom configuration
const client = new Client(config);
...
const config2 = {
  baseUrl: "http://xxx.xxx.xxx.86:8080/engine-rest",
  use: logger,
  asyncResponseTimeout: 10000,
  workerId: 'Client_2'
};
// create a Client instance with custom configuration
const client2 = new Client(config2);
...
Then these clients subscribe to the invoiceCreator topic on Camunda BPM engine. This topic is defined in the “Create Invoice” task in our BPM process model we created in the beginning and deployed to the Camunda BPM engine:
...
client.subscribe("invoiceCreator", handler);
client2.subscribe("invoiceCreator", handler);
...
The actual work is performed by the handler function, which is specified as a call-back when subscribing to the topic. It can be anything, but for testing purposes, I implemented the following very simple functionality. It will just take the task id and write it to the mysql database with the workerId, timestamp, and an error message in case of any errors. Like this:
...
connection.query('INSERT INTO invoiceCreator (task_id,worker_id,note) VALUES (\'' + task.id + '\',\'' + taskService.events.options.workerId + '\',\'' + e.message.substring(254) + '\')', function (error, results, fields) {
      if (error) throw error;
...
This can be a simulation of some simple external business application. Note that both workers will use the same mysql database to store the data.
Client application
This is the last piece of the whole setup. We need a client application, which will trigger the execution of the business process. My first attempt was a perl script, which used a REST call to Camunda BPM engine to start the execution. This was too simple and later I created an apache JMeter test plan to do the same, but using JMeter I can start several execution threads at the same time.
Here is my Test Plan:
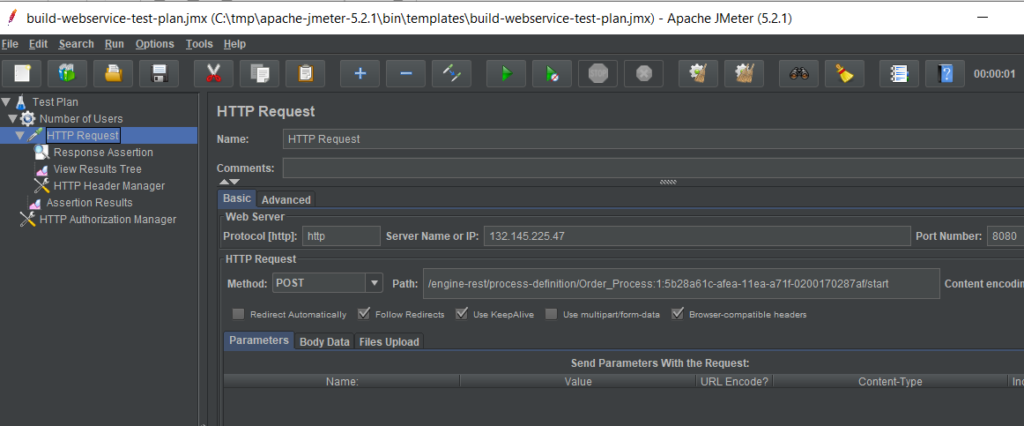
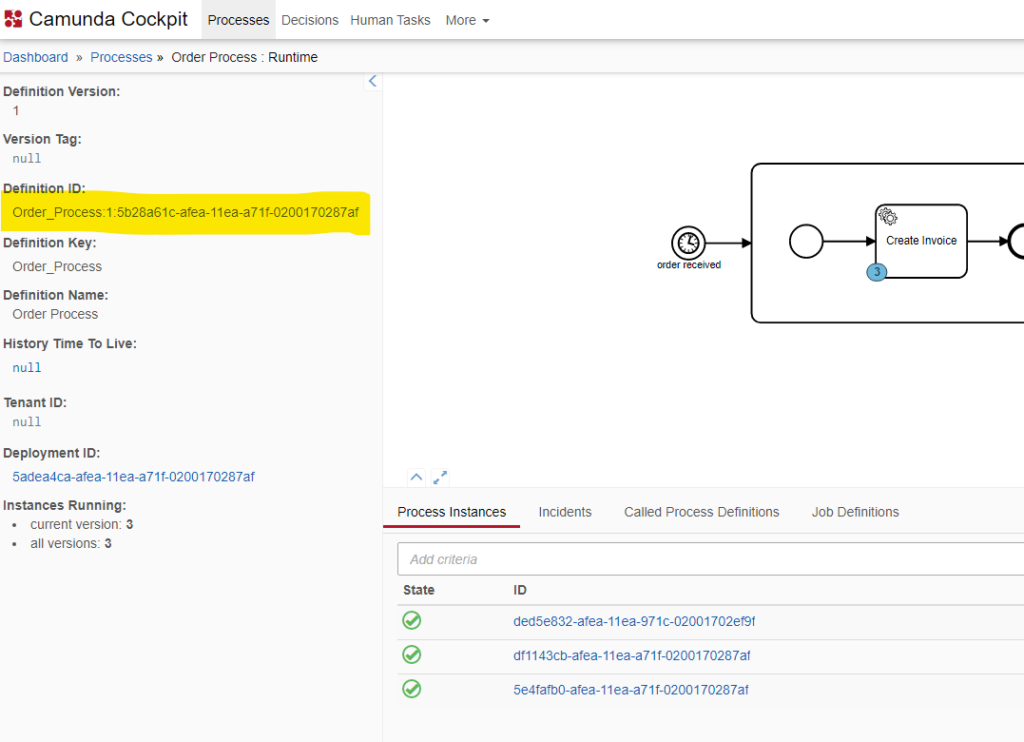
The most important part of it is obviously the HTTP Request. Here we specify the target IP and Port Number and also the HTTP Request properties. We will use POST method and in the path we have the ID of the process definition Order_Process:1:5b28a61c-afea-11ea-a71f-0200170287af. This is taken from the Cockpit application:
By the way, the target IP is the external IP of the Load Balancer.
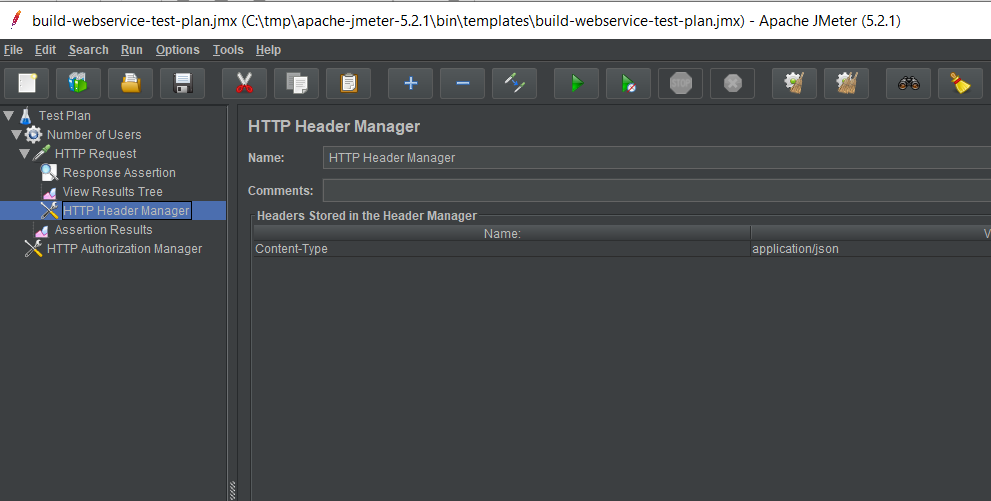
Two more important components, HTTP Header Manager, which specifies Content-Type: application/json:
And the HTTP Authorization Manager, which is needed to specify user name and password to connect to Camunda BPM:

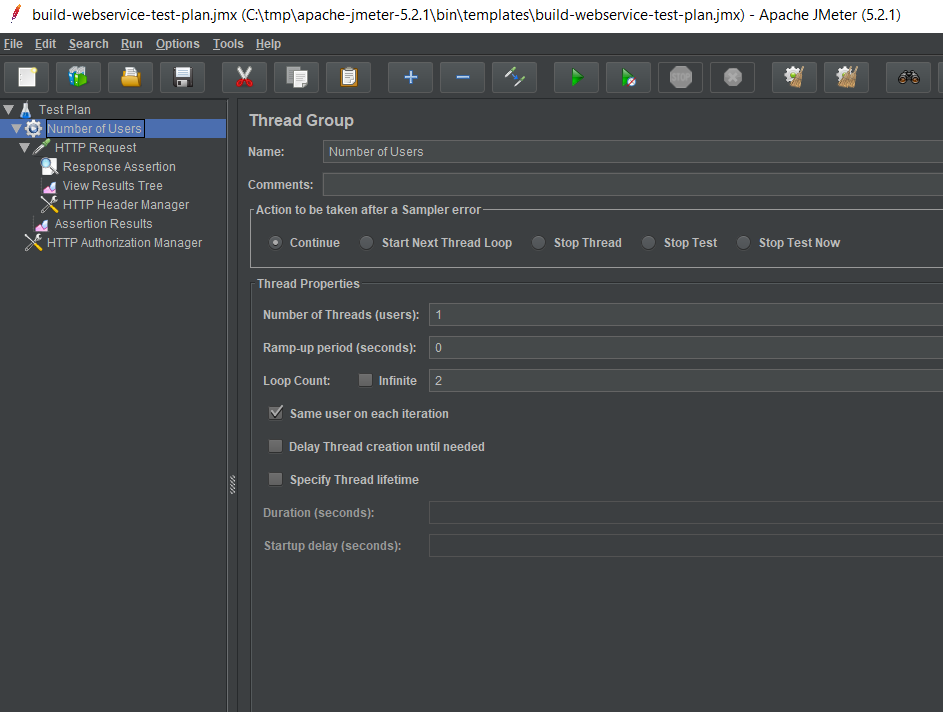
With all components of our Test Plan in place, we can go to the Thread Group and configure the number of Threads and the Loop Count:
After that we can run our Test Plan and observe the results in the View Results Tree:
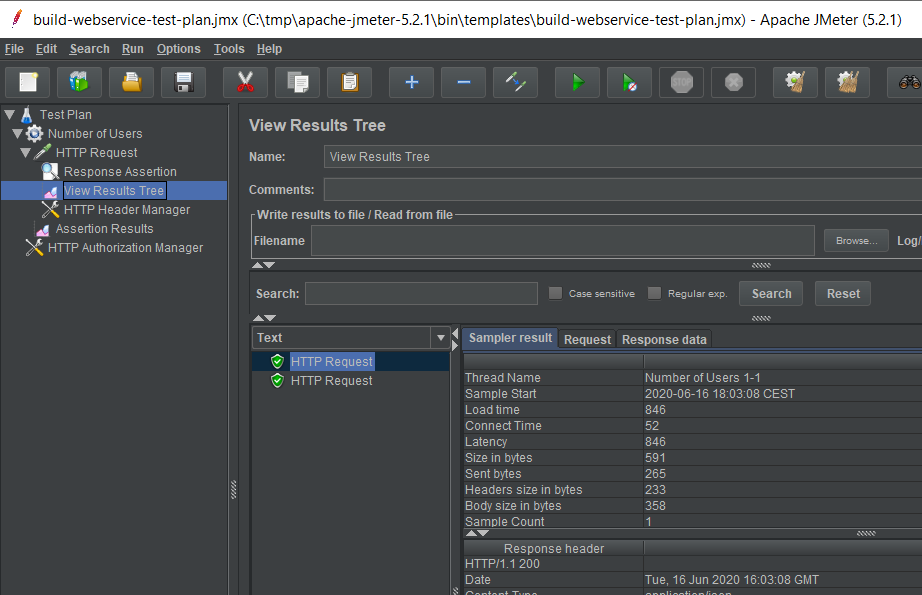
So we started two requests, both successful with the HTTP Response code 200.
voilà!
Discussion
What we achieved so far? Actually we successfully started two processes on Camunda BPM engine. Let’s take a look at the Cockpit application:
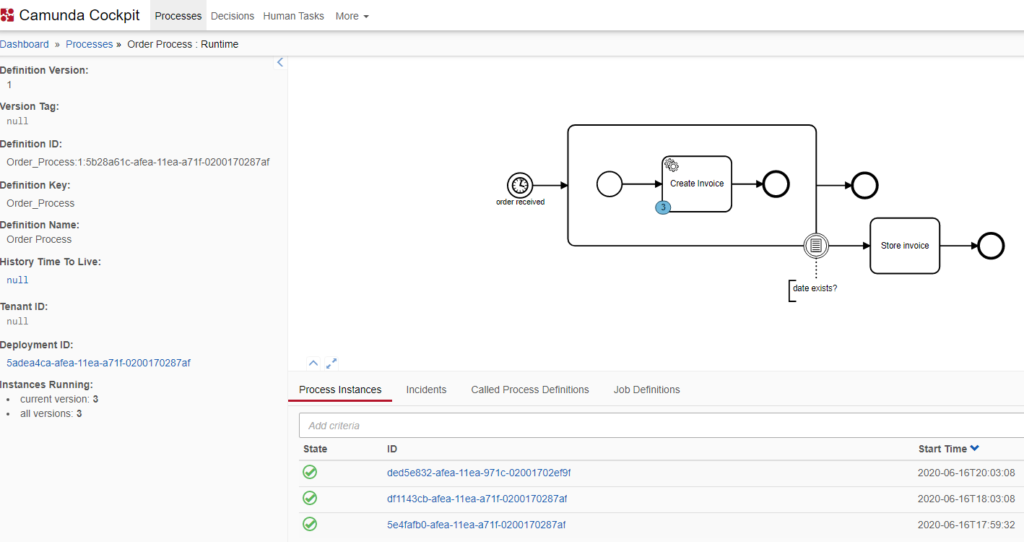
Nice picture, but it seems like there are 3 instances of the Create Invoice task, that are waiting for something. We started 2 just now and another one I created earlier with my first test. They are sitting and waiting because I haven’t started my external task workers on my external host yet. Let’s do it:
root@ultra:/home/olegme/charge-card-worker# nodejs index.js
Client_1: ✓ subscribed to topic invoiceCreator
Client_2: ✓ subscribed to topic invoiceCreator
Client_2: ✖ couldn't complete task 5e53ce68-afea-11ea-a71f-0200170287af, External Task 5e53ce68-afea-11ea-a71f-0200170287af cannot be completed by worker 'Client_2'. It is locked by worker 'Client_1'.
Client_2: ✖ couldn't complete task df122e33-afea-11ea-a71f-0200170287af, External Task df122e33-afea-11ea-a71f-0200170287af cannot be completed by worker 'Client_2'. It is locked by worker 'Client_1'.
Client_2: ✖ couldn't complete task ded9439a-afea-11ea-971c-02001702ef9f, External Task ded9439a-afea-11ea-971c-02001702ef9f cannot be completed by worker 'Client_2'. It is locked by worker 'Client_1'.
Client_1: ✓ completed task ded9439a-afea-11ea-971c-02001702ef9f
Client_1: ✓ completed task 5e53ce68-afea-11ea-a71f-0200170287af
Client_1: ✓ completed task df122e33-afea-11ea-a71f-0200170287af
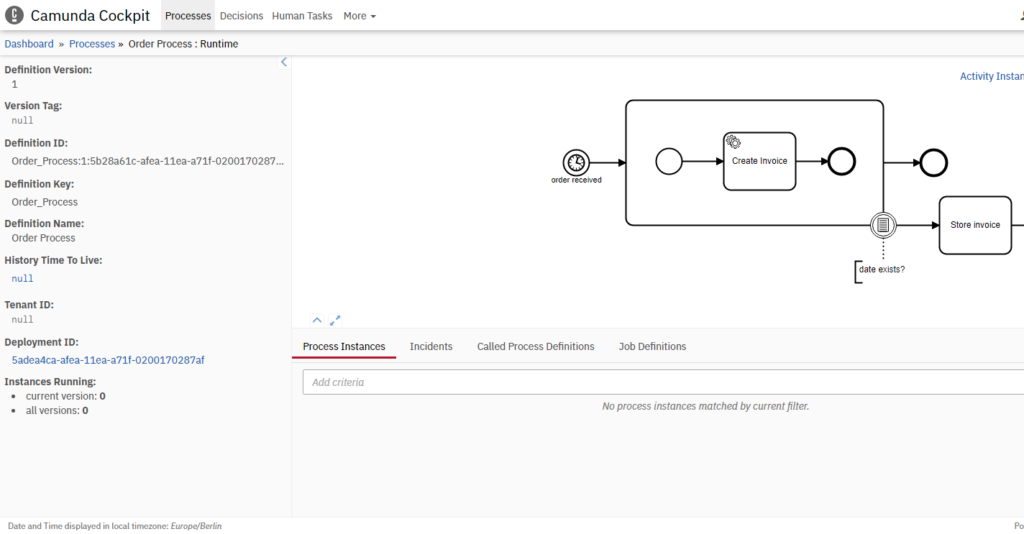
What does the above listing show? We started very well, our two workers subscribed to the topic, but then things started to fail. However, a careful reading of the above output shows that all tasks have been actually processed. The errors reported by the second worker (Client_2) only show that it didn’t get any work to do because the first worker (Client_1) was already working on the respective task. We can expect that if we start more threads with a higher loop count, the second worker will process some tasks as well. There is a very good explanation here: https://blog.camunda.com/post/2015/09/scaling-camunda-bpm-in-cluster-job/. It compares the situation with a jar of candies, where jobs are trying to acquire as many sweeties as possible, but some of them, like Clinet_2 in our case, is always trying to pick the piece, already taken by the other(s).
Parallel job execution in a cluster environment is an interesting topic on itself, but it won’t be covered here. If we take a look at the Cockpit, we will see that all tasks are processed and this is the result we need:
Caveats
In the test described above, I used just one single thread to trigger task execution. Apache JMeter gives a natural opportunity to increase the number of threads and thus to see how the system behaves under load.
It turned out that increasing the load leads to random errors with the message “Process engine persistence exception”. These errors appear on the client side (JMeter), but also in the external client/worker application. My impression is that after Oracle upgraded their Cloud ATP database to 19c, there are more of theses errors.
I currently don’t have time to investigate the reason for these errors. Probably I’ll do it in my next article.
References
- Camunda BPM Documentation
- Java Connectivity with Autonomous Database (ATP or ADW) using 19c and 18.3 JDBC