Recap
In the previous article, I finished preparing the BPMN model to run it on Camunda 8. There are two more things to address. We will create and deploy a worker for the Service Task Create Invoice to our Camunda 8 cluster.
Worker for the Service Task
We already created a Service Task worker for Camunda 7 (see Docker, Kubernetes, and Co. – part II). Now we have to redesign it using the new Zeebe Node.js Client. We will use this client to connect to the Zeebe Gateway and request jobs to execute. The concept is described here: Job workers .
Here is the respective source code:
require('dotenv').config();

const zb_conf = {
  gateway: process.env.HOST,
  port: process.env.GTPORT,
  retry: process.env.RETRY,
  maxRetries: process.env.MAX_RETRIES
};

const pg_conf = {
  host: process.env.PGHOST,
  user: process.env.PGUSER,
  password: process.env.PGPASSWORD,
  database: process.env.PGDATABASE,
  port: process.env.PGPORT,
  sslmode: "disable"
};


const ZB = require('zeebe-node')
const { Pool } = require('pg')
const fs = require('fs')

void (async () => {

  const zbc = new ZB.ZBClient(zb_conf.gateway + ':' + zb_conf.port, {retry: zb_conf.retry,
                                                        maxRetries: zb_conf.maxRetries,
                                                        logLevel: 'DEBUG'
                                                    })

  const pool = new Pool(pg_conf)

  const zbWorker = zbc.createWorker({
    taskType: 'invoice-creator',
      taskHandler: (job) => {
		  zbWorker.log('Starting invoice-creator job handler ...');

		  pool
		  .query('INSERT INTO invoiceCreator (task_id,worker_id) VALUES ($1,$2)',[job.key + "_" + job.processInstanceKey,job.worker])
		  .then((res) => {
			  zbWorker.log('Database query done')
			  const date = new Date();
			  const invoice = fs.readFileSync("./assets/invoice.txt");
			  job.complete({date: date,invoice:invoice.toString('base64'),job_key:job.key})
			  zbWorker.log('Handler job completed for job_key = ' + job.key)
		  })
		  .catch((err) =>
		  {
			  zbWorker.error('Handler error');
			  zbWorker.log(err.message);
			  job.fail({
				errorMessage: "Handler error" + "code: " + err.code + "; severity: " + err.severity + "; message: " + err.message,
				retryBackOff: 2000,
				retries: 1,
			  })
		  })

	  },
      // the number of simultaneous tasks this worker can handle
      maxJobsToActivate: 32,
      // the amount of time the broker should allow this worker to complete a task
      //timeout: Duration.seconds.of(30),
      // One of 'DEBUG', 'INFO', 'NONE'
      loglevel: 'INFO',
      // Called when the connection to the broker cannot be established, or fails
      onConnectionError: () => zbWorker.log('Disconnected'),
      // Called when the connection to the broker is (re-)established
      onReady: () => zbWorker.log('Connected.'),
      worker: 'invoice-worker-c8',
	  failProcessOnException: true
    })
})()
Let’s review the most important part.
In lines 3 and 10, here we create two sets of environment variables to configure the connection to our Zeebe engine and to the PostgreSQL database, respectively. For local testing we will be using the .env file and provide these environment variables in our deployment manifest when deploying to the cluster.
In lines 26 and 31 we create two clients, for Zeebe and for PostgreSQL and at line 33 we instantiate our worker.
From line 35 we have the job handler, which will implement our business logic. It creates a record in the database table, reads a file from the filesystem and sets two process variables to the current data and to the base64 encoded representation of the file content.
If an error occurs, like the database is unavailable, it will “fail” the job and inform the Zeebe engine.
Deploy to the cluster
Service Task worker can be deployed anywhere; it just needs access to the Zeebe gateway deployed in our cluster. In fact, it could also be run as a desktop Node application. But why make it simple?
Preparing the database
We would need a database for our Service Task worker, which we prepared in our previous article. And naturally, we will use the PostgreSQL database deployed in the cluster as a part of the Camunda 8 Helm chart. This database is being used by the KeyClock instance, so we need to make some changes. We will create a new user, database, and table to store the data. Also, we will have to ensure that a connection to the database can be established from another POD using these new user credentials.
The downside of the above approach is that if we redeploy Camunda 8 chart, we will have to apply these database changes again. And manually. That’s why I’ll try to provide step-by-step instructions below.
Let’s get cracking.
Getting admin access to the database
List of PODs:
olegme@master-node:~/k0suser@computer$ kubectl get pods -n c8
NAME                                      READY   STATUS    RESTARTS   AGE
camunda8-identity-7984d4b948-l9fhj        1/1     Running   0          59m
camunda8-keycloak-0                       1/1     Running   0          59m
camunda8-operate-66f4587f8d-zf72b         1/1     Running   0          59m
camunda8-optimize-6948b47b5b-fvc55        1/1     Running   0          44m
camunda8-postgresql-0                     1/1     Running   0          59m
camunda8-tasklist-7595f6c4bb-pd5vb        1/1     Running   0          59m
camunda8-zeebe-0                          1/1     Running   0          59m
camunda8-zeebe-gateway-68b8fcf696-2xfbr   1/1     Running   0          59m
elasticsearch-master-0                    1/1     Running   0          59m
elasticsearch-master-1                    1/1     Running   0          59m
olegme@master-node:~/k0s$
List of secrets:
olegme@master-node:~/k0suser@computer$ kubectl get secrets -n c8
NAME TYPE DATA AGE
camunda8-connectors-identity-secret Opaque 1 64m
camunda8-keycloak Opaque 1 64m
camunda8-operate-identity-secret Opaque 1 64m
camunda8-optimize-identity-secret Opaque 1 64m
camunda8-postgresql Opaque 2 64m
camunda8-tasklist-identity-secret Opaque 1 64m
sh.helm.release.v1.camunda8.v1 helm.sh/release.v1 1 64m
olegme@master-node:~/k0s$
Extract the database password for the admin user postgres from the secret:
olegme@master-node:~/k0suser@computer$ kubectl get secret camunda8-postgresql -n c8 -o jsonpath='{.data.postgres-password}’ | base64 -d && echo
XXXXXXXXX
olegme@master-node:~/k0s$
Take the extracted password to the next paragraph.
Create new user and grant permissions
Login to the database POD and connect to the database. Use the password we extracted in the previous step:
olegme@master-node:~/k0suser@computer$ kubectl exec –stdin –tty camunda8-postgresql-0 -n c8 — /bin/bash
I have no name!@camunda8-postgresql-0:/$
I have no name!@camunda8-postgresql-0:/user@computer$ psql -U postgres
Password for user postgres:
psql (15.1)
Type “help” for help.
postgres=#
Create table
Let’s create the database, and the user and grant the needed privileges:
postgres=# create database camunda;
CREATE DATABASE
postgres=# create user camunda with encrypted password ‘camunda’;
CREATE ROLE
postgres=# grant all privileges on database camunda to camunda;
GRANT
postgres=# \c camunda
You are now connected to database “camunda” as user “postgres”.
postgres=# grant all on schema public to camunda;
GRANT
postgres=# exit
The last GRANT statement looks a bit weird, but in the newest version of PostgreSQL this is needed for a user to be able to create tables.
Now we connect as a user camunda and create a table to store the data:
I have no name!@camunda8-postgresql-0:/user@computer$ psql -U camunda -d camunda
Password for user camunda:
psql (15.1)
Type “help” for help.


camunda=> CREATE TABLE invoiceCreator (
camunda(> id SERIAL,
camunda(> created_on TIMESTAMP NOT NULL DEFAULT NOW(),
camunda(> task_id varchar(128) NOT NULL,
camunda(> worker_id varchar(128) NOT NULL,
camunda(> note varchar(255),
camunda(> PRIMARY KEY (id)
camunda(> );
CREATE TABLE
camunda=> \dt
List of relations
Schema | Name | Type | Owner
——–+—————-+——-+———
public | invoicecreator | table | camunda
(1 row)


camunda=>
Let’s create an image
The next step is to create an image, which we can use to deploy our little service to the cluster. We will use the same artefacts we used in one of the previous articles (see Docker, Kubernetes, and Co. – part II), Docker and package.json.
But this time, I would like to avoid using Docker Desktop on my Windows machine; I removed it sometime in the past and don’t want to install it again. There is another nice tool – Buildah (see https://github.com/containers/buildah). It can be installed just via a package manager, and I’ll be using my master node as my Linux workstation; unfortunately, Buldah cannot be used under Windows.
Image creation is easy and goes like that, after changing into the project working directory:
olegme@master-node:~/create-invoice-worker-c8user@computer$ ls -al
total 92
drwxr-xr-x 5 olegme olegme 4096 May 23 08:16 .
drwxr-xr-x 21 olegme olegme 4096 May 23 14:08 ..
drwxr-xr-x 2 olegme olegme 4096 May 15 20:28 assets
-rw-r–r– 1 olegme olegme 995 May 23 17:21 create-invoice-worker-c8.yaml
-rw-r–r– 1 olegme olegme 396 May 22 22:27 Dockerfile
-rw-r–r– 1 olegme olegme 72 May 23 08:16 .dockerignore
-rw-r–r– 1 olegme olegme 153 May 7 11:59 .env
drwxr-xr-x 7 olegme olegme 4096 May 22 20:27 .git
-rw-r–r– 1 olegme olegme 2175 May 2 15:50 .gitignore
-rw-r–r– 1 olegme olegme 2449 May 17 17:38 index.js
drwxr-xr-x 84 olegme olegme 4096 May 7 11:52 node_modules
-rw-r–r– 1 olegme olegme 309 May 5 17:59 package.json
-rw-r–r– 1 olegme olegme 38792 May 5 17:59 package-lock.json
-rw-r–r– 1 olegme olegme 27 Feb 3 18:30 README.md
olegme@master-node:~/create-invoice-worker-c8user@computer$ buildah bud -t olegme/create-invoice-worker-c8
STEP 1: FROM docker://node:16
Getting image source signatures
Copying blob f38700a2e11e done
Copying blob a3f8e4a0ed53 done
Copying blob a739c67a76c3 done
Copying blob b84b1175afa3 done
Copying blob c722db24a050 done
Copying blob 51e0d706266f done
Copying blob f36686a8f4d2 done
Copying blob 0a7d41d447c6 done
Copying config 4fbbe8e45e done
Writing manifest to image destination
Storing signatures
STEP 2: WORKDIR /usr/src/app
STEP 3: COPY package*.json ./
STEP 4: RUN npm install
npm WARN deprecated uuid@3.4.0: Please upgrade to version 7 or higher. Older versions may use Math.random() in certain circumstances, which is known to be problematic. See https://v8.dev/blog/math-random for details.


added 104 packages, and audited 105 packages in 41s


13 packages are looking for funding
run npm fund for details


found 0 vulnerabilities
npm notice
npm notice New major version of npm available! 8.19.4 -> 9.6.7
npm notice Changelog: https://github.com/npm/cli/releases/tag/v9.6.7
npm notice Run npm install -g npm@9.6.7 to update!
npm notice
STEP 5: COPY . .
STEP 6: CMD [ “node”, “index.js” ]
STEP 7: COMMIT olegme/create-invoice-worker-c8
Getting image source signatures
Copying blob c7e59965a0b4 skipped: already exists
Copying blob 9973bce96c7e skipped: already exists
Copying blob 4e859b592d91 skipped: already exists
Copying blob 69d98464f012 skipped: already exists
Copying blob bb22ae3d4d1e skipped: already exists
Copying blob d99b6238254e skipped: already exists
Copying blob ac19349f690b skipped: already exists
Copying blob 47b7f8f10c48 skipped: already exists
Copying blob 71438c299eef done
Copying config 7e24e9743c done
Writing manifest to image destination
Storing signatures
–> 7e24e9743c7
7e24e9743c7cf7769e6c66215120406dff654b7321976f6acaa7a8f4db2af787
olegme@master-node:~/create-invoice-worker-c8$
Here we can see the list of images:
olegme@master-node:~/create-invoice-worker-c8user@computer$ buildah images
REPOSITORY TAG IMAGE ID CREATED SIZE
localhost/olegme/create-invoice-worker-c8 latest 7e24e9743c7c 19 minutes ago 957 MB
olegme@master-node:~/create-invoice-worker-c8$
Let’s push it to the docker hub repository using the access credentials we created in the article referenced above:
olegme@master-node:~/create-invoice-worker-c8user@computer$ buildah login -u olegme -p Moscow2022 docker.io
Login Succeeded!
olegme@master-node:~/create-invoice-worker-c8user@computer$ buildah push olegme/create-invoice-worker-c8
Getting image source signatures
Copying blob c7e59965a0b4 skipped: already exists
Copying blob d99b6238254e skipped: already exists
Copying blob 69d98464f012 skipped: already exists
Copying blob 9973bce96c7e skipped: already exists
Copying blob bb22ae3d4d1e skipped: already exists
Copying blob 4e859b592d91 skipped: already exists
Copying blob 71438c299eef done
Copying blob 47b7f8f10c48 skipped: already exists
Copying blob ac19349f690b skipped: already exists
Copying config 7e24e9743c done
Writing manifest to image destination
Storing signatures
olegme@master-node:~/create-invoice-worker-c8user@computer$ buildah logout docker.io
Removed login credentials for docker.io
olegme@master-node:~/create-invoice-worker-c8$
Create a resource definition file
Let’s create a yaml resource file, that we will use to deploy our service task to the cluster. This is relatively easy, we just have to make sure we define all the needed environment variables, that are needed to connect to the Zeebe gateway and the database. Here we go:
apiVersion: apps/v1
kind: Deployment
metadata:
  name: create-invoice-worker-c8
spec:
  replicas: 1
  selector:
    matchLabels:
      app: create-invoice-worker-c8
  template:
    metadata:
      labels:
        app: create-invoice-worker-c8
    spec:
      containers:
      - name: create-invoice-worker-c8-container
        image: olegme/create-invoice-worker-c8:latest
        imagePullPolicy: Always
        env:
        - name: HOST
          value: "camunda8-zeebe-gateway"
        - name: GTPORT
          value: "26500"
        - name: RETRY
          value: "true"
        - name: MAX_RETRIES
          value: "5"
        - name: PGHOST
          value: "camunda8-postgresql"
        - name: PGUSER
          value: "camunda"
        - name: PGPASSWORD
          value: "camunda"
        - name: PGDATABASE
          value: "camunda"
        - name: PGPORT
          value: "5432"
      imagePullSecrets:
      - name: regcred
A couple of things to note. Starting from line 20, we define the environment variables our small application needs. Line 17 specifies the name of the image file, we will download from the Docker Hub, and line 39 specifies the name of a secret we created to fetch the image from the Docker Hub. It is the same as in Docker, Kubernetes, and Co. – part II.
Deploy and start the Service Task
Easy-peasy. Our Service Task can be deployed via a simple kubectl apply -f ... and here is the log output after we started a few processes from the Desktop Modeler:

What about our Script Task?
Let’s now take a look at Camunda Cockpit, after we started some processes:

What does this picture tell us? Well, good news first. We started three processes, and our Service Task ran successfully for all three of them (note the grey check-mark); they successfully went the “below” path, which means the gateway saw the “date” process variable set for them in the Service Task and sent them to our Store invoice Script Task. Bad news – they got stuck at it (note the green label with the number “3”).
Why is that? Simple – unlike Camunda 7, in Camunda 8 there is no means to execute a script task inside the engine, and we need to implement it on our own and, consequently, somewhere outside. More information is available here – https://docs.camunda.io/docs/components/modeler/bpmn/script-tasks/
Based on the above documentation, we have three options. Number one – use FEEL expression language. The integrated FEEL Scala engine will execute it. But then there is no way we can print something to the console; at least, I couldn’t find how to print out anything in a FEEL expression. Option two – create a job worker similar to what we’ve done for the Service Task. But that would be too boring, considering we’ve done it once. And, number three, use the community extension Zeebe Script Worker.
Implement Script Worker
This community extension can work with several languages, like Kotlin and Groovy, but we stick to JavaScript. And, let’s have more advanced functionality. For example, why don’t we take an encoded Invoice file, provided as a process variable and print out it’s content? Let’s do so.
There are two caveats, though. For one, it requires JDK 11, because the Nashorn Java interpreter is not available in the later JDK versions, and, as it turned out, there is a bug in the worker code, which leads to a ConcurrentModificationException if configured to run with more than one thread. See this issue https://github.com/camunda-community-hub/zeebe-script-worker/issues/255.
Equipped with that knowledge, we will install JDK 11 on our master-node:
olegme@master-node:~/zeebe-script-workeruser@computer$ java –version
openjdk 11.0.18 2023-01-17
OpenJDK Runtime Environment (build 11.0.18+10-post-Debian-1deb11u1)
OpenJDK 64-Bit Server VM (build 11.0.18+10-post-Debian-1deb11u1, mixed mode, sharing)
And use the following configuration file:
zeebe:
  client:
    worker:
      defaultName: script-worker
      defaultType: script
      threads: 1

    job.timeout: 10000
    broker.contactPoint: 192.168.2.221:26500
    security.plaintext: true
We will start it like this:
olegme@master-node:~/zeebe-script-workeruser@computer$ java -jar zeebe-script-worker-1.2.0.jar –spring.config.location=file:application.yaml


_
/ _ |_ _ (_ _ _ . _ |_ | | _ _ | _ _
/_ (- (- |) (- _) ( | | |) | |/| (_) | |( (- |
|


=============================================================
(v1.2.0)


2023-05-31 20:49:38.705 INFO 1572 — [ main] i.z.script.ZeebeScriptWorkerApplication : Starting ZeebeScriptWorkerApplication v1.2.0 using Java 11.0.18 on master-node with PID 1572
And this is the console output, where we see the content of the base64 encoded invoice file created in the Service Task:
2023-05-31 20:49:44.997 INFO 1572 — [ main] i.z.script.ZeebeScriptWorkerApplication : Started ZeebeScriptWorkerApplication in 7.315 seconds (JVM running for 8.753)
Warning: Nashorn engine is planned to be removed from a future JDK release
Invoice:
Amount: £10,000
VAT: £2,000
Total: £12,000


Invoice:
Amount: £10,000
VAT: £2,000
Total: £12,000


Invoice:
Amount: £10,000
VAT: £2,000
Total: £12,000
Where is all the fun?
All the real fun is in our BPMN model. Let’s take a look at the Script Task properties:
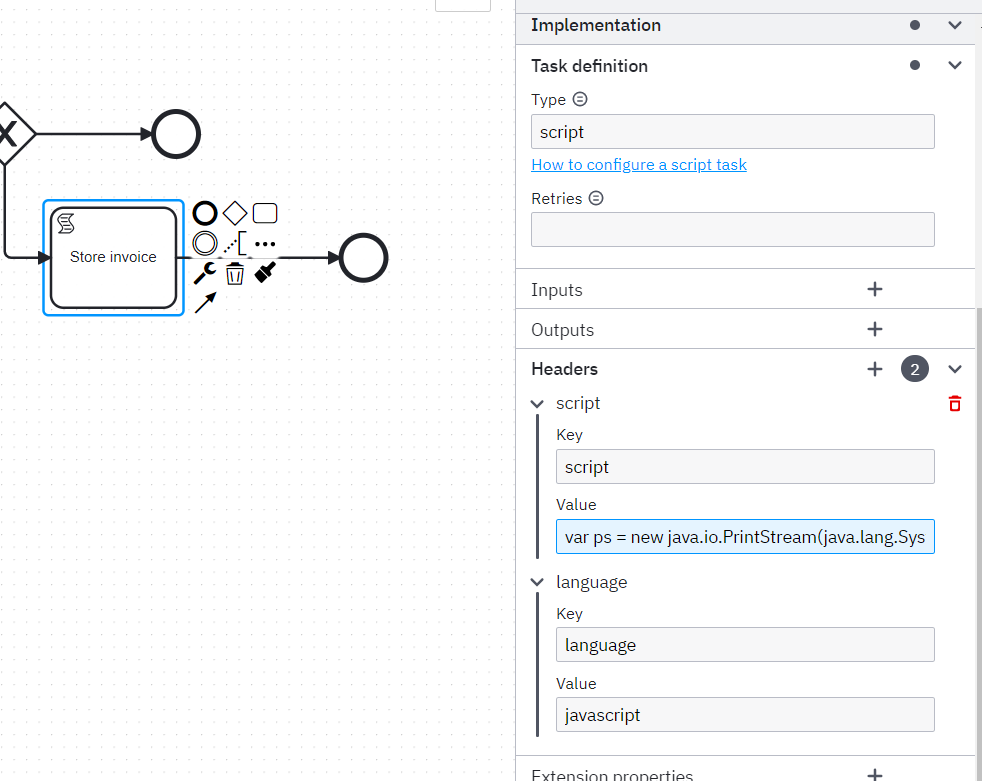
Note the Task Definition Type = script, language definition and the actual script code in the Value field. Let’s take a look at the pretty printed code:
var ps = new java.io.PrintStream(java.lang.System.out, true, "ISO-8859-1");
function base64_decode(s) {
    var base64chars = "ABCDEFGHIJKLMNOPQRSTUVWXYZabcdefghijklmnopqrstuvwxyz0123456789+/";
    s = s.replace(new RegExp('[^' + base64chars.split("") + '=]', 'g'), "");
    var p = (s.charAt(s.length - 1) == '=' ? (s.charAt(s.length - 2) == '=' ? 'AA' : 'A') : "");
    var r = "";
    s = s.substr(0, s.length - p.length) + p;
    for (var c = 0; c < s.length; c += 4) {
        var n = (base64chars.indexOf(s.charAt(c)) << 18) + (base64chars.indexOf(s.charAt(c + 1)) << 12) + (base64chars.indexOf(s.charAt(c + 2)) << 6) + base64chars.indexOf(s.charAt(c + 3));
        r += String.fromCharCode((n >>> 16) & 255, (n >>> 8) & 255, n & 255);
    }
    return r.substring(0, r.length - p.length);
}
ps.println("Invoice: \n" + base64_decode(invoice));
Due to the limitation of the Nashorn JavaScript engine, we have to provide our own implementation of base64 decoding function, and the rest is pretty trivial. We take the environment variable invoice, which is a base64 encoded invoice file, decode it and print out the content. This produces the above output.
Conclusion or wire it all together
Here is our end-to-end test environment. Top left – Apache JMeter, which will run 10 threads with 10 calls each. It will connect to the Zeebe gateway and start 100 process instances. Bottom left corner – Camunda Operate; here on the dashboard, we will see the number of processes in the respective states. Top right – output window of our Script worker, where we see invoices printed out on the screen. Bottom right – logfile of our Script Tak worker running as a Kubernetes POD.
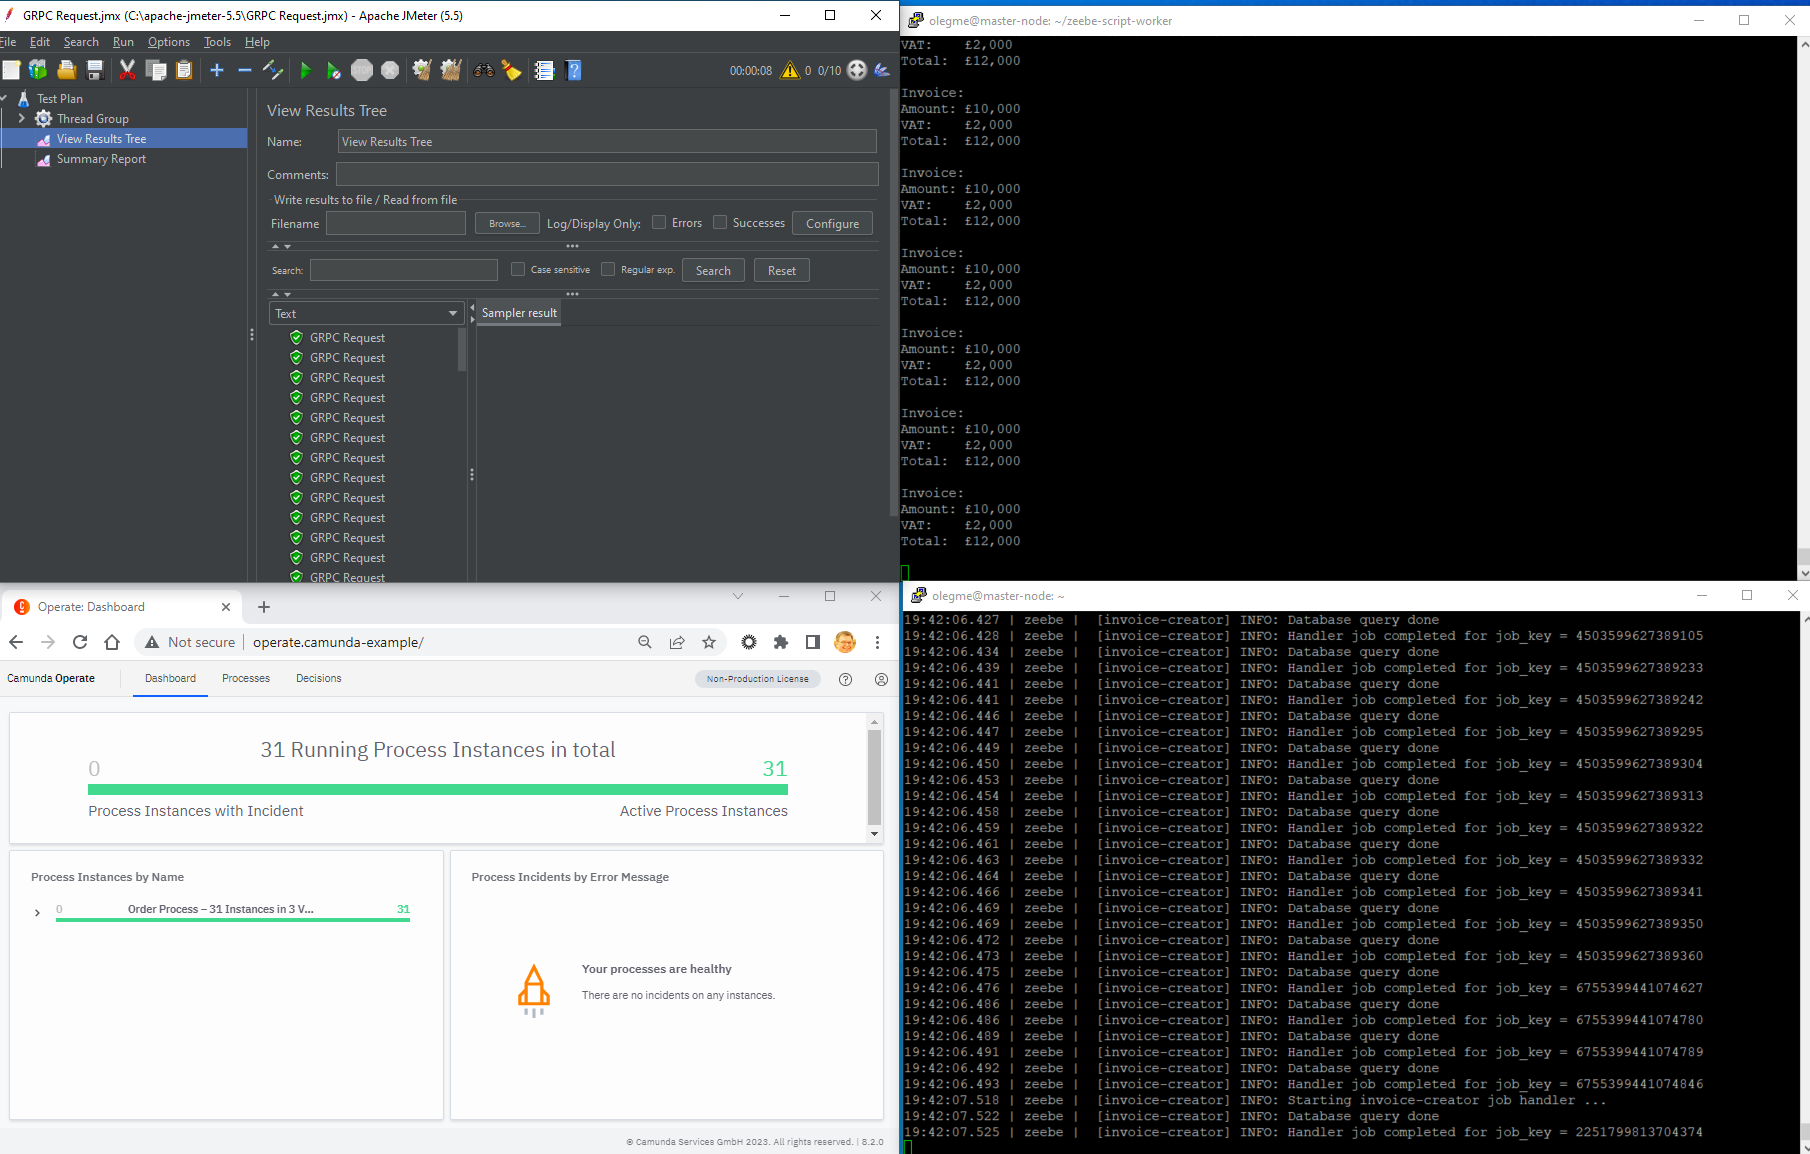
Well, the picture is far from ideal. Let’s review some numbers.
Apache JMeter. All 100 GRPC calls were sent without errors, average processing time – 417 ms.
Camunda Operate. It seems like some 31 process instances were running simultaneously, 100 instances finished without errors, and it took just a few seconds for every instance to go through.
Camunda Optimize. With the help of Camunda Optimize, it was possible to get some more insides. The average process duration was 2,59 sec, with Create Invoice (Service Task) taking an average of 1,12 sec and Store Invoice (Script Task) taking 1,56 sec.
With that, I conclude my Camunda 8 on Kubernetes adventure.