Here is our plan. We will deploy our BPMN model to our Camunda platform from the previous article Docker, Kubernetes, and Co. and make it run, simple.
You may also want to take a look at one of the articles published in the past: Camunda on Oracle Cloud – will it work?
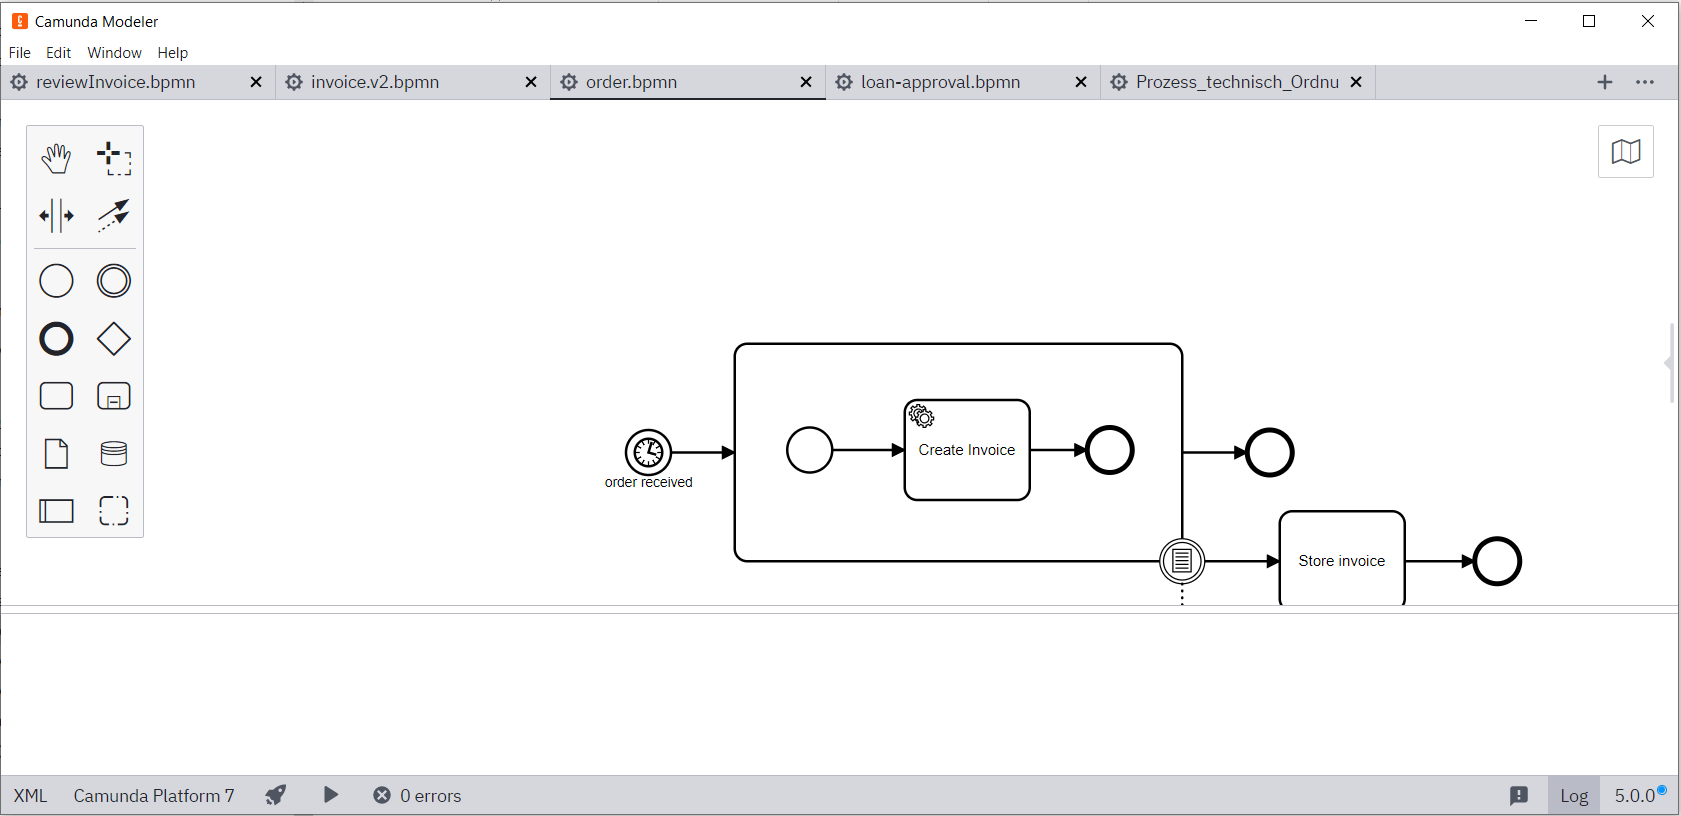
BPMN model
Let’s take the BPMN model from the Camunda Quick Start application. In the Modeler 5.0.0 it looks like this:
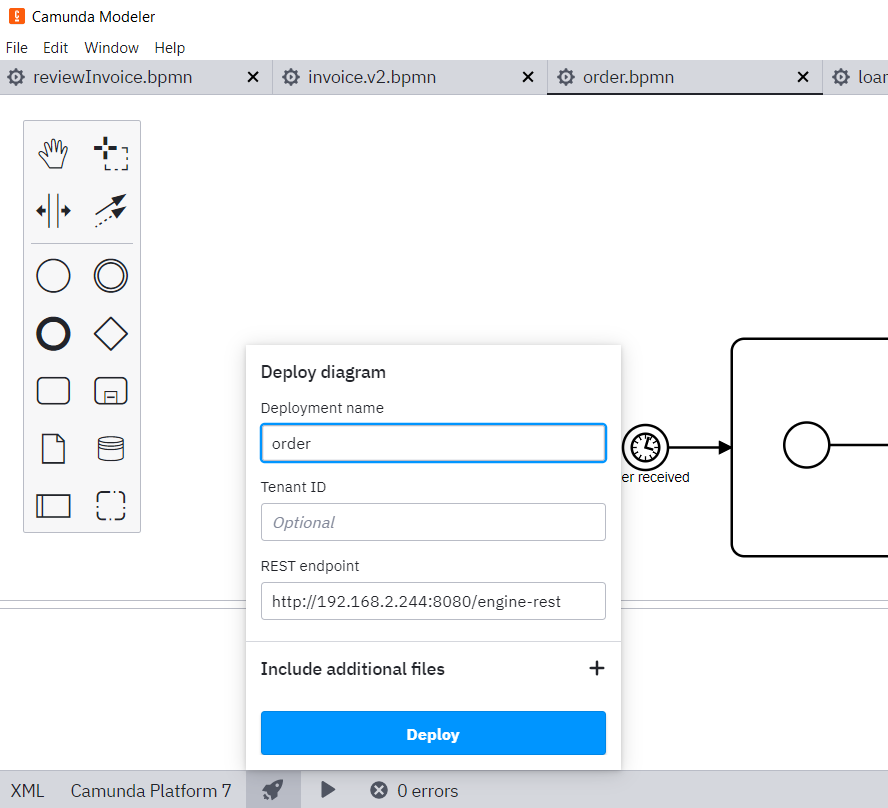
Let’s deploy to our just installed Caminda engine on the k0s cluster, make sure the target IP is right:
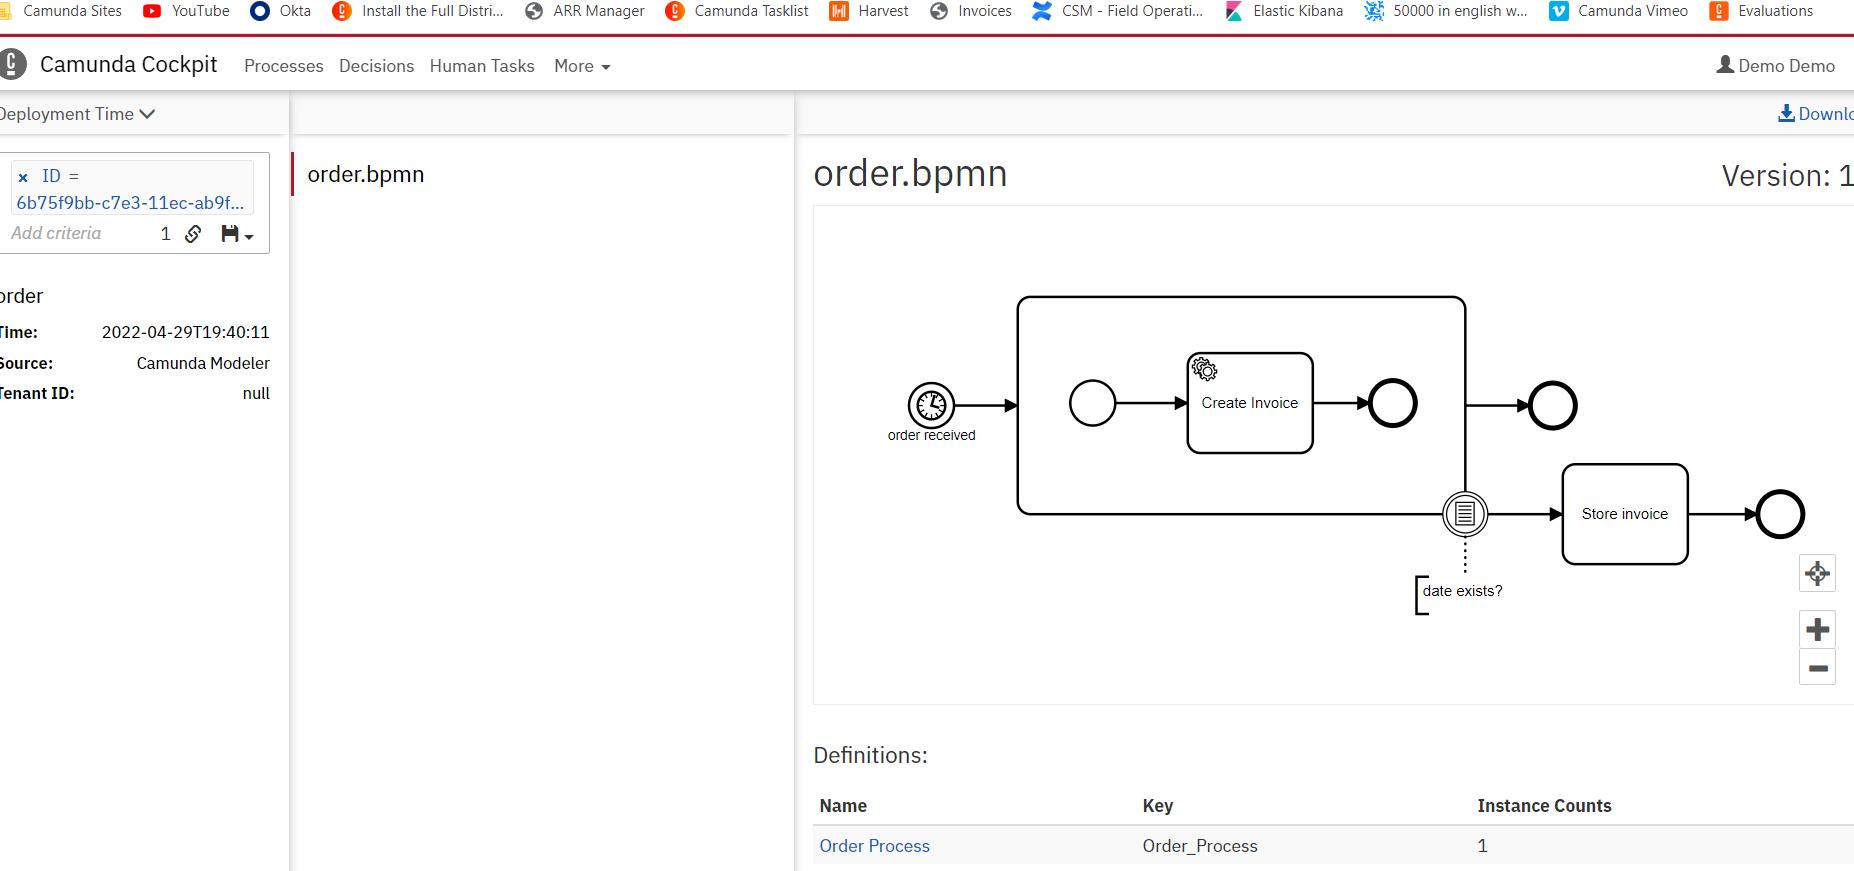
Here is the expected outcome:
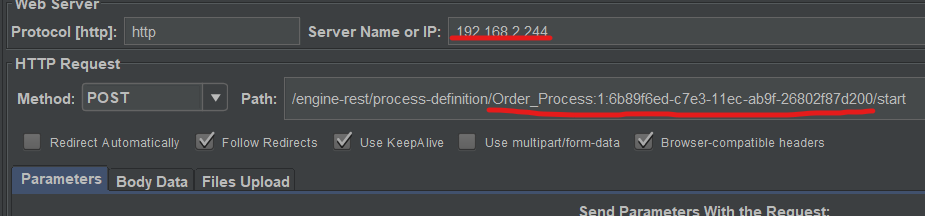
Let’s start our first process
We can do this using the Apache JMeter as described in Camunda on Oracle Cloud – will it work? We just have to use the right endpoint and the process ID, which can be found in the Camunda Cockpit:
And here is the process view in Camunda Cockpit:
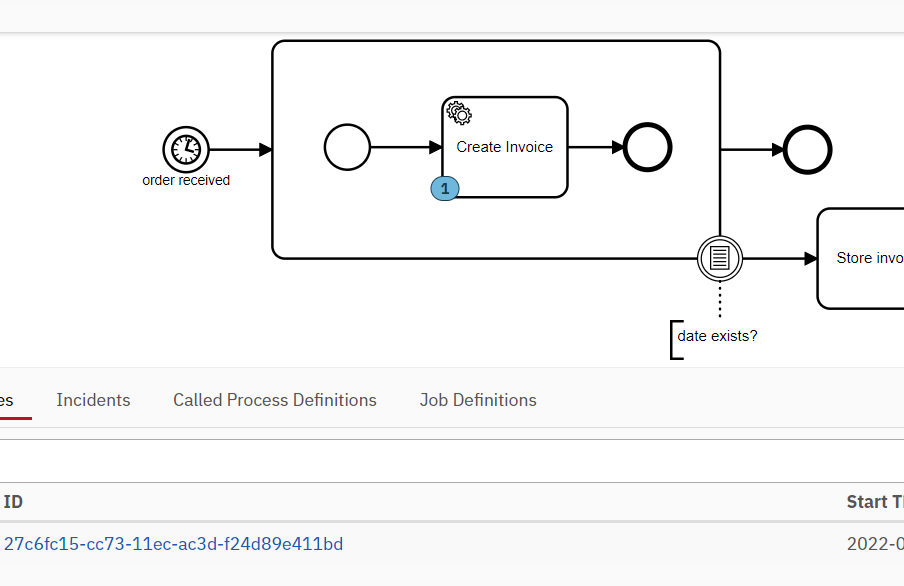
The process is waiting in the Create Invoice activity because this is a Service Task, that we haven’t yet implemented.
Service Task Implementation
There are two parts to it. We will create a working standalone application and then learn how to containerize it and run it in our Kubernetes cluster.
Standalone Create Invoice Application
We will start with the version of the Service Task application created in Camunda on Oracle Cloud – will it work?. Here is the repository: https://github.com/olegme/create-invoice-worker.
In addition to some code clean up we will change the following:
Use only one worker, which will connect to the LoadBalancer external IP. If we have more than one Camunda instance deployed, the LoadBalancer will forward our request to the available engine.
Add node.js module pg to connect to the PostgreSQL database.
Add node.js module dotenv, which can be used to simulate environment variables via a local file for initial testing. In the Kubernetes environment, we will use these environment variables to pass the information, needed to connect to the database server.
Let’s take a look at the code.
It starts with the configuration variables, which are either read from the local .env file or provided as environment variables. Note line 28, this piece is needed to solve PostgreSQL login issues with password based logins:
require('dotenv').config();

const conf = {
  host: process.env.PGHOST,
  user: process.env.PGUSER,
  password: process.env.PGPASSWORD,
  database: process.env.PGDATABASE,
  port: process.env.PGPORT,
  ssl: {
    rejectUnauthorized: false,
  }
};
Then we create a Client (Camunda client) and subscribe to a topic:
// create a Client instance with custom configuration
const client = new Client(config);
client.on("complete:success", ({ id }) => {
  console.log(`${client.options.workerId} --> completed task ${id}`);

});

client.on("complete:error", ({ id }, e) => {
  console.log(`${client.options.workerId} --> couldn't complete task ${id}, ${e}`);
});


// susbscribe to the topic: 'invoiceCreator'
client.subscribe("invoiceCreator", handler2);
And this handler is at the core of it:
const handler2 = async function ({ task, taskService }) {
  console.log('Starting handler...');
  const client = new pg.Client(conf);

  client
  .connect()
  .then(res => {
      console.log("Database connected, making query");
      return client.query('INSERT INTO invoiceCreator (task_id,worker_id) VALUES ($1,$2)',[task.id,taskService.events.options.workerId]);
  })
  .then(res => {
      client.end(console.log('Closed database client connection'));
      console.log("Query done, do the business logic and report success back to the engine");
      const date = new Date();
      const invoice = new File({ localPath: "./assets/invoice.txt" }).load();
      const minute = date.getMinutes();
      const variables = new Variables().setAll({ invoice, date });

      //Store variables in the process scope
      taskService.complete(task, variables);
      console.log("Success reported to the engine");
  })
  .catch(err => {
              console.error('Database error');
              console.log(err.message);
              client.end();
              //Report failure back to the engine
              taskService.handleFailure(task,{
                errorMessage: "Database error",
                errorDetails: "code: " + err.code + "; severity: " + err.severity + "; message: " + err.message,
                retries: 0,
                retryTimeout: 0
              });
              console.log("Failure reported back to the engine");

          }

  );

  console.log("Handler done");
}
In line #42 we insert the data into the database. In lines #46 to #49 we prepare some business-relevant information to be stored in the task variable. In line #52 we report the success back to the Camunda engine and in line #60 we report the failure to the engine in case of database errors.
And that’s all to it!
Containerize it!
This is a good starting point:
Let’s change into the application directory. We already have our package.json file:
{
  "name": "create-invoice-worker",
  "type": "commonjs",
  "version": "1.0.0",
  "description": "",
  "main": "index.js",
  "scripts": {
    "test": "echo \"Error: no test specified\" && exit 1",
	"start": "node index.js"
  },
  "author": "",
  "license": "ISC",
  "dependencies": {
    "camunda-external-task-client-js": "^2.2.0",
    "dotenv": "^16.0.0",
    "pg": "^8.7.3"
  }
}
Line #9 had to be added manually, it will tell the container which command to execute when started.
Next is the Docker file. Everything looks the same as in the example from the above URL with one exception, we don’t need the EXPOSE stanza. Our service task application is not a server and doesn’t expose any ports to the outside. Here is the file:
FROM node:16

# Create app directory
WORKDIR /usr/src/app

# Install app dependencies
# A wildcard is used to ensure both package.json AND package-lock.json are copied
# where available (npm@5+)
COPY package*.json ./

RUN npm install
# If you are building your code for production
# RUN npm ci --only=production

# Bundle app source
COPY . .

#EXPOSE 8080
CMD [ "node", "index.js" ]
Obviously, we need to adjust the last line to run the proper command when started.
Last piece – .dockerignore file. We already have it in our working directory, we will just extend it to make sure we don’t deploy the copies of all npm modules:
.gitignore
.env
node_modules
npm-debug.log
Build the image
We will use Docker Desktop on the local Windows laptop. It cannot be used in parallel with Oracle VirtualBox and we will need to apply some changes to Windows Registry to be able to switch between the two and the laptop has to be restarted after the changes. Also, the command prompt has to be run in Administrator mode. Here is the cheat sheet:
bcdedit /set hypervisorlaunchtype off - VBox
bcdedit /set hypervisorlaunchtype auto - Docker
Before we start with the build, we need to start Docker, otherwise, we will see an error message. Something like error during connect: This error may indicate that the docker daemon is not running.:…
Let’s build it:
user@computer$ docker build . -t olegme/create-invoice-worker
#2 [internal] load .dockerignore
…
#10 exporting to image
#10 sha256:e8c613e07b0b7ff33893b694f7759a10d42e180f2b4dc349fb57dc6b71dcab00
#10 exporting layers
#10 exporting layers 0.3s done
#10 writing image sha256:b27be6ffd05d2b774290022496706f0f07fc9f5bb24c79abd987343a04203d67 0.0s done
#10 naming to docker.io/olegme/create-invoice-worker done
#10 DONE 0.4s
Use ‘docker scan’ to run Snyk tests against images to find vulnerabilities and learn how to fix them
Everything went good, let’s check the image:
user@computer$ docker images
REPOSITORY                   TAG    IMAGE ID     CREATED        SIZE
olegme/create-invoice-worker latest b27be6ffd05d 22 minutes ago 913MB
postgres                     latest 5b21e2e86aab 3 weeks ago    376MB
camunda/camunda-bpm-platform latest 905a1cbf80c3 2 months ago   307MB
Let’s start it and see what happens:
user@computer$ docker run olegme/create-invoice-worker
✓ subscribed to topic invoiceCreator
✖ polling failed with RequestError: connect ECONNREFUSED 127.0.0.1:8080
✖ polling failed with RequestError: connect ECONNREFUSED 127.0.0.1:8080
✖ polling failed with RequestError: connect ECONNREFUSED 127.0.0.1:8080
✖ polling failed with RequestError: connect ECONNREFUSED 127.0.0.1:8080
What does the above result mean? Everything works as expected. We haven’t included the .env file in our image and also haven’t provided any environment variables. So, our small application is using some default values and it tries to connect to the localhost, which obviously fails as we don’t run any Camunda engine on our local Windows laptop.
Push to the repository
There are ways to use the image we just created similar to a local file, but it’s a bit complicated and so we go the simplest way. We will push it to the private remote repository on https://hub.docker.com/repository/docker/olegme/create-invoice-worker. For that, we will create our private repository with the name olegme/create-invoice-worker, which will be protected with the user name and a password. Let’s push our image there:
user@computer$ docker login –username=olegme -p XXX
WARNING! Using –password via the CLI is insecure. Use –password-stdin.
Login Succeeded

user@computer$ docker push olegme/create-invoice-worker
Using default tag: latest
The push refers to repository [docker.io/olegme/create-invoice-worker]
…
latest: digest: sha256:4d3adae53a09676b1bdc32eb4ba6df1b6b047d3f6f18462d83d4604688c2ccd8 size: 3049
We are done! In the next step, we will deploy our image to our Kubernetes cluster and it will be pulled from our private repository.
Run it on Kubernetes
A lot of preparation work ahead…
Create a secret to pull the image from the repository
Just follow the steps here: https://kubernetes.io/docs/tasks/configure-pod-container/pull-image-private-registry/
root@master-node:~# k0s kubectl create secret docker-registry regcred --docker-server=https://index.docker.io/v1/ --docker-username=olegme --docker-password=XXX --docker-email=olegme@gmx.de
secret/regcred created
Let’s check what is in the secret:
root@master-node:~# k0s kubectl get secret regcred --output=yaml
apiVersion: v1
data:
.dockerconfigjson: ey...
kind: Secret
metadata:
creationTimestamp: "2022-06-23T16:08:31Z"
name: regcred
namespace: default
resourceVersion: "226674"
uid: 027c386f-b0fc-47f2-a9cf-8abd61205bb3
type: kubernetes.io/dockerconfigjson
root@master-node:~# k0s kubectl get secret regcred --output="jsonpath={.data.\.dockerconfigjson}" | base64 --decode
{"auths":{"https://index.docker.io/v1/":{"username":"olegme","password":"XXX","email":"olegme@gmx.de","auth":"b..."}}}
Deploy the application
We will deploy our application now. This page is useful: Deploying Node.js apps in a local Kubernetes cluster. And also this one Define Environment Variables for a Container
Let’s take a look at our manifest file now:
apiVersion: apps/v1
kind: Deployment
metadata:
  name: create-invoice-worker
spec:
  replicas: 1
  selector:
    matchLabels:
      app: create-invoice-worker
  template:
    metadata:
      labels:
        app: create-invoice-worker
    spec:
      containers:
      - name: create-invoice-worker-container
        image: olegme/create-invoice-worker
        imagePullPolicy: Always
        env:
        - name: BASE_URL
          value: "http://camunda-bpm-platform:8080/engine-rest"
        - name: PGUSER
          value: camunda
        - name: PGHOST
          value: acid-pgtest1
        - name: PGPASSWORD
          value: KvfW9teVc6SOhQ92Jsrd7AWLBlh4jyDx4uRX4CUBkwnem0ntw2bD1dBWrvJTmFaI
        - name: PGDATABASE
          value: camunda
        - name: PGPORT
          value: "5432"
      imagePullSecrets:
      - name: regcred
Line #17 specifies the name of the image, line #32 points to the secret we created and starting from line #20 we provide the environment variables to the container, that are needed to configure our application. Better approach would be to store these values as secret value, but we take a shortcut to save time.
Let’s deploy it. We try a dry-run first to make sure our syntax is OK:
root@master-node:/home/olegme/k0s/manifests# k0s kubectl apply -f create-invoice-worker.yaml --dry-run='server'
deployment.apps/create-invoice-worker configured (server dry run)

root@master-node:/home/olegme/k0s/manifests# k0s kubectl apply -f create-invoice-worker.yaml
deployment.apps/create-invoice-worker configured

root@master-node:/home/olegme/k0s/manifests# k0s kubectl get pods
NAME READY STATUS RESTARTS AGE
acid-pgtest1-0 1/1 Running 4 (12d ago) 38d
camunda-bpm-platform-755589c9b7-m829b 1/1 Running 0 158m
create-invoice-worker-b95b889bb-gmmk2 1/1 Running 0 2m4s
nfs-subdir-external-provisioner-57c8c954df-n4w6c 1/1 Running 7 (18h ago) 38d
postgres-operator-855655d957-ldqdn 1/1 Running 10 (12d ago) 38d
postgres-operator-ui-5f4f44cf97-bmgq6 1/1 Running 2 (12d ago) 38d
And this works like a charm. We can start one process using Camunda Modeler and it just goes through. This is what we see in the logfile of our create-invoice-worker-b95b889bb-gmmk2 POD:
root@master-node:/home/olegme/k0s/manifests# k0s kubectl logs create-invoice-worker-b95b889bb-gmmk2
✓ subscribed to topic invoiceCreator
Starting handler...
Handler done
Database connected, making query
Closed database client connection
Query done, do the business logic and report success back to the engine
Success reported to the engine
✓ completed task cb38f6ae-d5fe-11ec-ace9-7eddd7666a97
Client_1 --> completed task cb38f6ae-d5fe-11ec-ace9-7eddd7666a97
We can see that our Service Task client is a bit chatty, but we leave it as is for now, it does its job and this is it.
Let’s wrap it up
This was a two-piece instalment, where we described steps to deploy Camunda 7 Platform on a Kubernetes cluster, including a node.js-based Service Task client and a PostgreSQL database cluster. We were able to deploy and run a simple BPMN model, possible improvements and performance tests will be covered in future articles.
Next immediate goal – do the same with Camunda 8, stay tuned!